As I did already an step by Step Step by Step Server 2016 Remote Desktop Services QuickStart Deployment #RDS #VDI #RDP #RemoteApp
https://robertsmit.wordpress.com/2015/06/23/step-by-step-server-2016-remote-desktop-services-quickstart-deployment-rds-vdi-rdp-remoteapp/
that’s Covering all the basics but currently there are so many options that I thought it is time to build a new reference guide for RDS. Remember this is my opinion. The good or bad this works and yes you can combine all the roles en split them in use the GUI version and use the other product as well.
I started this post a while ago and thinking about the best configuration but every time there is a little thing well maybe this isn’t the best. With that in mind I started to this blog post at least 6 times. And the best configuration is always “it depends” there are so many options and it is hard to say one size fits all it never is.
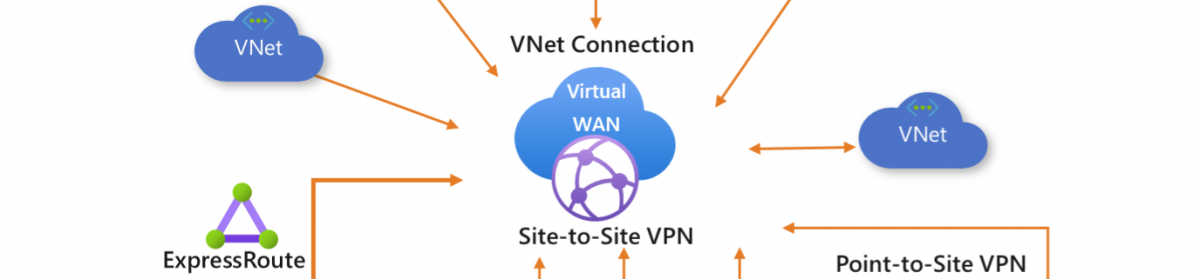
As Microsoft Ignite is just behind us, and as expected the New RDmi (RDS modern infrastructure) is almost there. Totally new design If you are using the Azure Components. But this is more like a RemoteApp replacement but what about on premise ? you can build some interesting configurations. The Hybrid model of the RDS farm with the Azure File Sync option. I see great possibility’s is some configurations. Building the RDS on Premise is not multi domain It all needs to be in one domain.
")
But should you wait if you want RDS ? well then you could wait for ever as there is always new exiting technology around the corner.
Just start with RDS and learn and yes maybe next year your design is obsolete but it will still work. So for now I want to touch the Current RDS build as I see on my old blog post a lot of you are building RDS on premise but also in azure. To build to max scalable Solution you will need to separate all roles.
But in this case I want to use the option to build a feature reference for RDS and yes this can also be a RS3 or above release(that’s core anyway). I use core Server where I can and after the traffic manager there is no firewall but it would make sense that you use one of your choice. Do use NSG’s for the public networks and or IP’s ! https://robertsmit.wordpress.com/2017/09/11/step-by-step-azure-network-security-groups-nsg-security-center-azure-nsg-network/
But if you can make use of the Azure Security Center and point the Webroles to the Azure Application Proxy.
")
As there is no default firewall I used a AAD application Proxy to access the Remote desktop Gateway website.
")
The Configuration is not that hard and well documented on the Microsoft Doc site : https://docs.microsoft.com/en-us/azure/active-directory/application-proxy-publish-remote-desktop
In this Blog Item I want to place the RDS basics to the next level, as everybody can install a next next finish installation, but this should be a next step. There is no need for slow performance with the right configuration.
I’m using Core only except for the Session hosts or on servers that its not handy. Separated the Web Roles ,Gateway & Connection Brokers and all is High available. And in front a Traffic manager that determine what Webserver is near you. But this is “only needed” if you use multiple regions or want to separate the traffic.. The Use Profile disk will be hosted with a 3 node Storage Space Direct Cluster As I think a 3th or even a 4th node will give you more benefit of the Storage and Uptime. But this is also a “depends” you can even use a Single file server (non redundant) in this case the UPD are redundant and say I want 3 TB disk space for the UPD. I did some performance testing and the results are below.
")
with the Premium disk we got a good amount of performance. As I’m using SMB3 storage I will also add a second nic to all my RDS hosts for the SMB3 storage. This will take some extra steps to get the right performance.
As you could also go for a single file server with a lot off disk, It saves money as there is only one server and onetime the disks, but there is no redundancy for the UPD. But in this case the backup is easier. If you can handle the downtime and make the UPD that way that it is less important. then this is a nice option.
If you build this in Azure you must be aware that even Azure is not AlwaysOn. Therefor we need to make sure the RDS site is always Up. And again this seems to be a lot of servers and maybe you don’t want all this and want to have only one frontend server and one RD Session host it is all up to you but I think the Holy Grail is between this and a Single server.
In this case I use Powershell for the deployment. And I deploy all VM’s from a template that way I know that All VM’s are the same in this configuration.

First I setup Traffic Manager this is an easy setup and based on performance. I deployed all the VM’s in azure with a Powershell script.
As all new machines are added to the server manager we can use the to add to the farm.
")
When adding the machines just do one gateway and one Connection broker. then configure the RD connection broker HA Database

For the Connection broker Database I use a Database as an Service in Azure.

Just create the Database and use the connection string in the RDS farm

On the Connection brokers you will need the Native SQL client.
https://docs.microsoft.com/en-us/sql/connect/odbc/download-odbc-driver-for-sql-server
https://www.microsoft.com/en-us/download/details.aspx?id=50402
Now that the Database is Connected we can add all the other servers and add the certificate.

The Used String looks like :
Driver={ODBC Driver 13 for SQL Server};Server=tcp:mvpserver.database.windows.net,1433;Database=rdsbd01;Uid=admin@mvpserver;Pwd={your_password_here};Encrypt=yes;TrustServerCertificate=no;Connection Timeout=30;

The SQL native client is required for the connection on all Connection brokers!

Now that the connection High available mode is configured we can add another connection broker


Now that the connection broker is redundant we start adding some web servers
First we are adding the Web role to the new core webservers.

Adding the Servers could take some time. Just as the Webserver we add extra connection brokers and Gateway servers. Same method.

Even if the servers don’t need a reboot I reboot them anyway just to make sure my config is working.

The Same we do with the Gateway role and the Connection broker. Now that all roles are added we can do some configuration.
As we already placed the RDS Database to a Azure we need to apply the Certificate to all the servers in the Farm (Web/gateway/RDCB)
")
In this Configuration I use a Azure load balancing option this is Free and easy to use. I will use 3 Azure Load balancing configurations in this.
Two internal and one Public. The public gets an external IP.

The important setting here is the Load balancer type Public or internal
Azure Load Balancer can be configured to:
- Load balance incoming Internet traffic to virtual machines. This configuration is known as Internet-facing load balancing.
- Load balance traffic between virtual machines in a virtual network, between virtual machines in cloud services, or between on-premises computers and virtual machines in a cross-premises virtual network. This configuration is known as internal load balancing.
- Forward external traffic to a specific virtual machine.
All resources in the cloud need a public IP address to be reachable from the Internet. The cloud infrastructure in Azure uses non-routable IP addresses for its resources. Azure uses network address translation (NAT) with public IP addresses to communicate to the Internet.
Building the VM’s We keep them in the same availability set as described below.

Update Domains
For a given availability set, five non-user-configurable update domains are assigned by default (Resource Manager deployments can then be increased to provide up to 20 update domains) to indicate groups of virtual machines and underlying physical hardware that can be rebooted at the same time. When more than five virtual machines are configured within a single availability set, the sixth virtual machine is placed into the same update domain as the first virtual machine, the seventh in the same update domain as the second virtual machine, and so on.
Fault Domain
Fault domains define the group of virtual machines that share a common power source and network switch. By default, the virtual machines configured within your availability set are separated across up to three fault domains for Resource Manager deployments (two fault domains for Classic). While placing your virtual machines into an availability set does not protect your application from operating system or application-specific failures, it does limit the impact of potential physical hardware failures, network outages, or power interruptions.
When creating the availability groups we are using the Managed disks and we always can change the VM Size and or disk type. That is the flexible use of Azure.

If your VM(s) are deployed using the Resource Manager (ARM) deployment model and you need to change to a size which requires different hardware then you can resize VMs by first stopping your VM, selecting a new VM size and then restarting the VM. If the VM you wish to resize is part of an availability set, then you must stop all VMs in the availability set before changing the size of any VM in the availability set. The reason all VMs in the availability set must be stopped before performing the resize operation to a size that requires different hardware is that all running VMs in the availability set must be using the same physical hardware cluster. Therefore, if a change of physical hardware cluster is required to change the VM size then all VMs must be first stopped and then restarted one-by-one to a different physical hardware clusters.

As changing the disk type to premium we can also adjust the disk size to get more local IOPS. But the cost will get up !!
Simple and scalable VM deployment
Managed Disks handles storage for you behind the scenes. Previously, you had to create storage accounts to hold the disks (VHD files) for your Azure VMs. When scaling up, you had to make sure you created additional storage accounts so you didn’t exceed the IOPS limit for storage with any of your disks. With Managed Disks handling storage, you are no longer limited by the storage account limits (such as 20,000 IOPS / account). You also no longer have to copy your custom images (VHD files) to multiple storage accounts. You can manage them in a central location – one storage account per Azure region – and use them to create hundreds of VMs in a subscription.
Now that we have several RDS host deployed we can add them to the Farm.
Adding RDS host. Is just the seam as adding the Gateway servers or Connection brokers.

Now that the basics are installed We can do some configuring.
Building the UPD share you can use the blog post for Storage spaces with the SOFS : https://robertsmit.wordpress.com/2015/05/12/windows-server-2016-with-storage-spaces-direct-building-sofs-with-storage-spaces-direct-winserv-win2016-s2d-howtopics/
But keep in mind that there is no one size fits all. Calculate how big your storage must be and do not size the total on your top users but on average usage.
Azure VM sizing is also not just pick one, a lot off new sizes are there and pick the one that you need. High performance or memory optimized does not mean you can only use that VM for that role. checkout the specs and test your vm. I think the B Sizes are promising and cheap for a lot off roles.
Check this site for your Azure VM https://docs.microsoft.com/en-us/azure/virtual-machines/windows/sizes
If you want a regular share then use the file server or just share a folder and use this in the RDS. but remember users are reading and writing to this share it will use bandwidth and IOPS on the disk.
Setting the File share can only be done once per RDS collection. As shown below. Create a collection and user your share for the User profile disk to land.


If you want to change the UPD size it can only be done in PowerShell . Also the file share Setting and changing the URL of the Gateway can only be done with powershell after the first config.
Set-RDSessionCollectionConfiguration -CollectionName Collection -MaxUserProfileDiskSizeGB 40

Now that everything is in place we launch the RDS webpage. As I modified the page. Just make a modified page and save it somewhere and after a new deployment Copy past it in the C:\Windows\Web\RDWeb.

So the page can be with or with out “ public computer”


Now that the Gateway ,Connection Broker and the RDS hosts are in place we can open the web frontend. As mentioned above I customized the page a bit. (save your modifications on a save place for the next deployment)
That’s all for part 1
In the next part I’m showing you a quick overview of the HTML5 client.
Follow Me on Twitter @ClusterMVP
Follow My blog https://robertsmit.wordpress.com
Linkedin Profile Http://nl.linkedin.com/in/robertsmit
Google Me : https://www.google.nl
Bing Me : http://tinyurl.com/j6ny39w
LMGTFY : http://lmgtfy.com/?q=robert+smit+mvp+blog


![image_thumb[3]](http://scom.aca-computers.nl/image/ce508463d960_DCE5/image_thumb3.png "image_thumb[3]")


![image_thumb[22]](http://scom.aca-computers.nl/image/ce508463d960_DCE5/image_thumb22.png "image_thumb[22]")
![image_thumb[23]](http://scom.aca-computers.nl/image/ce508463d960_DCE5/image_thumb23.png "image_thumb[23]")

![image_thumb[25]](http://scom.aca-computers.nl/image/ce508463d960_DCE5/image_thumb25.png "image_thumb[25]")
![image_thumb[26]](http://scom.aca-computers.nl/image/ce508463d960_DCE5/image_thumb26.png "image_thumb[26]")

![image_thumb[30]](http://scom.aca-computers.nl/image/ce508463d960_DCE5/image_thumb30.png "image_thumb[30]")
")
")
")
")

")


")


![clip_image002[4]](http://scom.aca-computers.nl/image/Windows-Server-2016-With-Hyper-v_112E7/clip_image0024.jpg "clip_image002[4]")


