Deploy Windows Admin Center High Availability running on a Windows Server 2019 Cluster #winserv #WAC #WindowsAdminCenter #AzureArc #Azure #Hybrid

The new new tool Windows Admin Center is THE tool to use when managing your Environment you can install this on almost any server (no Domain Controller) but even this device needs a reboot from time to time. Therefor we make the Windows Admin Center High available. When installing this on a cluster the Tools gets better uptime. And is there when you need it. The resources that are used is minimal.

Windows Admin Center is a new, locally-deployed, browser-based management tool set that lets you manage your Windows Servers with no Azure or cloud dependency. Windows Admin Center gives you full control over all aspects of your server infrastructure and is particularly useful for managing servers on private networks that are not connected to the Internet.

Windows Admin Center is the modern evolution of “in-box” management tools, like Server Manager and MMC. It complements System Center – it’s not a replacement.

First we take our cluster, in this case my test cluster witch runs all kinds of load.

image

Get the latest Windows Admin center build. http://aka.ms/WACDownload

save this on the Cluster node, and remember you can’t run Windows Admin Center with IE – Internet Explorer!

When checking this I saw the Cluster team create already a Powershell Script to make the WAC HA. so there goes my blog.

image

Well You can run the PowerShell Scripts. But that’s no Fun.  but I understand if you are busy and or you don’t want to know what is behind the script.

https://docs.microsoft.com/en-us/windows-server/manage/windows-admin-center/deploy/high-availability

image

In this case I do it all manual, well not all there are some good parts in the Script

First we need a Certificate, I use a self signed and yes this needs to be changed every 90 days

Fill in the Variables 

$clientAccessPoint=”mvpwac03″
$tmpPassword = “Temppassword”
$certPath = “c:\temp\sme3.pfx”
#####
Write-Output “Creating self signed certificate”
    $domain= (Get-WmiObject win32_computersystem).Domain
    $dnsName = $clientAccessPoint+”.”+$domain
    $cert = New-SelfSignedCertificate -DnsName $dnsName -CertStoreLocation “cert:\LocalMachine\My” -NotAfter (Get-Date).AddMonths(3)
    $certPassword = ConvertTo-SecureString -String $tmpPassword -Force -AsPlainText
    $cert | Export-PfxCertificate -FilePath $certPath -Password $certPassword | Out-Null 


image

Import the Certificate

$cert.Import($certPath, $certPassword,’DefaultKeySet’)

image

Save the Thumbprint for later

$cert.Thumbprint

image

Now We are installing the Windows Admin Center , I use a preview but get the latest version here http://aka.ms/WACDownload

imageimage

Don’t forget the trusted site checkbox.

imageimage

Here is the Thumbprint that is used in the Certificate , Next is installing the Windows Admin Center.

image

Now that Windows Admin Center is installed We are almost ready.

The next steps are stopping the services and set this to manual as the Failover Cluster Manager controls the run status

Set-Service ServerManagementGateway -startuptype “manual”
Stop-Service ServerManagementGateway

image

Now that this is ready we need to think about the file location as this is currently on the C drive.

image

And we don’t want to have two or more configurations. there for we place this on the CSV volume.

Copy all the file into the CSV volume folder

imageimage

When this is done we are adjusting the Services.

imageimage


$staticAddress=”10.255.255.222″
$portNumber=”443″
$smePath=”C:\ClusterStorage\vdisk20\ux”
$certThumbprint=”1D243A17BBD62271DA0DF8EE4FF0FD65C5AE5A37″
$clientAccessPoint=”mvpwac03″
$registryPath = “HKLM:\Software\Microsoft\ServerManagementGateway\Ha”

    New-ItemProperty -Path $registryPath -Name IsHaEnabled -Value “true” -PropertyType String -Force | Out-Null
    New-ItemProperty -Path $registryPath -Name StoragePath -Value $smePath -PropertyType String -Force | Out-Null
    New-ItemProperty -Path $registryPath -Name Thumbprint -Value $certThumbprint -PropertyType String -Force | Out-Null
    New-ItemProperty -Path $registryPath -Name Port -Value $portNumber -PropertyType DWord -Force | Out-Null
    New-ItemProperty -Path $registryPath -Name ClientAccessPoint -Value $clientAccessPoint -PropertyType String -Force | Out-Null
    $staticAddressValue = $staticAddress -join ‘,’
    New-ItemProperty -Path $registryPath -Name StaticAddress -Value $staticAddress -PropertyType String -Force | Out-Null
   
    New-ItemProperty -Path HKLM:\Software\Microsoft\ServerManagementGateway -Name InstallDir -Value $smePath -PropertyType String -Force | Out-Null
    New-ItemProperty -Path HKLM:\SYSTEM\CurrentControlSet\Services\ServerManagementGateway -Name ImagePath -Value $smePath\sme.exe -PropertyType String -Force | Out-Null

   
    #grant permissions to Network Service for the UX folder
    $Acl = Get-Acl $UxFolder
    $sID = New-Object System.Security.Principal.SecurityIdentifier(“S-1-5-20″)
    $Ar = New-Object  system.security.accesscontrol.filesystemaccessrule($sID,”FullControl”,”ContainerInherit,ObjectInherit”,”None”, “Allow”)
    $Acl.SetAccessRule($Ar)
    Set-Acl $UxFolder $Acl


After running this the path changed to the CSV location and the HA values are there

image


image

The Windows Admin Center HA values are there.

The last step on this cluster node is creating the cluster resource.

$staticAddress=”10.255.255.222″
$clientAccessPoint=”mvpwac03″
$registryPath2 = “SOFTWARE\Microsoft\ServerManagementGateway\Ha”
   
Add-ClusterGenericServiceRole -ServiceName ServerManagementGateway -Name $clientAccessPoint -CheckpointKey $registryPath2 -StaticAddress $staticAddress

image

Remember the HA cluster resource does not need the  HKLM:\ as in the other variables.

image

Now we have installed the Windows Admin Center in the Cluster.  For all the other nodes in the cluster we need to do almost the same.

Or we could export the Register keys and add them in the nodes as we already placed the files on the CSV and created a cluster resource.

All the other nodes don’t have a Windows Admin Center services. Using the register keys is working but you will need a reboot.  As we create first a fake services and then place the regkeys no reboot is needed. Or just import the register keys and do a reboot of the node.

New-Service -Name ServerManagementGateway -DisplayName “Windows Admin Center” -BinaryPathName “C:\ClusterStorage\vdisk20\ux”

First regkey <>

Windows Registry Editor Version 5.00

[HKEY_LOCAL_MACHINE\SOFTWARE\Microsoft\ServerManagementGateway]
“Version”=”1.1.24609.0”
“InstallDir”=”C:\\ClusterStorage\\vdisk20\\ux”
“SmePort”=”443”
“UseHttps”=”1”
“DevMode”=””
“DataEncryptionCertificateThumbprint”=”83D5FBC5AD758C2B23BADBD83117AC5EAA0E8F2B”
“RedirectPort80″=”1”

[HKEY_LOCAL_MACHINE\SOFTWARE\Microsoft\ServerManagementGateway\Ha]
“IsHaEnabled”=”true”
“StoragePath”=”C:\\ClusterStorage\\vdisk20\\ux”
“Thumbprint”=”1D243A17BBD62271DA0DF8EE4FF0FD65C5AE5A37”
“Port”=dword:000001bb
“ClientAccessPoint”=”mvpwac03”
“StaticAddress”=”10.255.255.222”


Second Regkey <>

Windows Registry Editor Version 5.00

[HKEY_LOCAL_MACHINE\SYSTEM\CurrentControlSet\Services\ServerManagementGateway]
“Type”=dword:00000010
“Start”=dword:00000003
“ErrorControl”=dword:00000001
“ImagePath”=”C:\\ClusterStorage\\vdisk20\\ux\\sme.exe”
“DisplayName”=”Windows Admin Center”
“ObjectName”=”NT Authority\\NetworkService”
“Description”=”Windows Admin Center”
“FailureActions”=hex:80,51,01,00,00,00,00,00,00,00,00,00,03,00,00,00,14,00,00,\
  00,00,00,00,00,d0,07,00,00,00,00,00,00,d0,07,00,00,00,00,00,00,00,00,00,00
“Environment”=hex(7):43,00,4f,00,4d,00,50,00,55,00,54,00,45,00,52,00,4e,00,41,\
  00,4d,00,45,00,3d,00,4d,00,56,00,50,00,57,00,41,00,43,00,30,00,33,00,00,00,\
  5f,00,43,00,4c,00,55,00,53,00,54,00,45,00,52,00,5f,00,4e,00,45,00,54,00,57,\
  00,4f,00,52,00,4b,00,5f,00,46,00,51,00,44,00,4e,00,5f,00,3d,00,4d,00,56,00,\
  50,00,57,00,41,00,43,00,30,00,33,00,2e,00,6d,00,76,00,70,00,2e,00,6c,00,6f,\
  00,63,00,61,00,6c,00,00,00,5f,00,43,00,4c,00,55,00,53,00,54,00,45,00,52,00,\
  5f,00,4e,00,45,00,54,00,57,00,4f,00,52,00,4b,00,5f,00,48,00,4f,00,53,00,54,\
  00,4e,00,41,00,4d,00,45,00,5f,00,3d,00,4d,00,56,00,50,00,57,00,41,00,43,00,\
  30,00,33,00,00,00,5f,00,43,00,4c,00,55,00,53,00,54,00,45,00,52,00,5f,00,4e,\
  00,45,00,54,00,57,00,4f,00,52,00,4b,00,5f,00,4e,00,41,00,4d,00,45,00,5f,00,\
  3d,00,4d,00,56,00,50,00,57,00,41,00,43,00,30,00,33,00,00,00,00,00

With this in place all nodes can run Windows admin center in HA mode, but it will not run on IE. and this is the only default browser on the server. To test if it is working you will need Edge or Chrome.

image

As you can see it is not that simple to make things high available. Using the Powershell scripts provided by microsoft But if using these script you need to rename the MSI file if you are using the insiderspreview or any other build that is not named as ServerManagementGateway.msi

WindowsAdminCenterPreview1808.msi rename to ServerManagementGateway.msi 

You can deploy Windows Admin Center in a failover cluster to provide high availability for your Windows Admin Center gateway service. The solution provided is an active-passive solution, where only one instance of Windows Admin Center is active. If one of the nodes in the cluster fails, Windows Admin Center gracefully fails over to another node, letting you continue managing the servers in your environment seamlessly.

High-availability deployment scripts from Windows Admin Center HA Setup Scripts zip file. Download the .zip file containing these scripts to your local machine and then copy the scripts as needed.


Follow Me on Twitter @ClusterMVP

Follow My blog https://robertsmit.wordpress.com

Linkedin Profile Robert Smit MVP Linkedin profile

Google  : Robert Smit MVP profile

How to join Windows Server 2019 to the Azure AD #AAD #Winserv #WIMVP #AD #Hybrid #Azure

For Some time it is possible to join devices to the Azure AD. Personally I know this was working for Windows 10 but Windows Server 2019, in this blog post I’ll show some ideas and thoughts. It would be nice  if native Azure MFA would work to log on. Also for some options your Azure AD needs to be at least P1.

Organizations can now utilize Azure Active Directory (AD) authentication for their Azure virtual machines (VMs) running Windows Server 2019 Datacenter edition or Windows 10 1809 and later. Using Azure AD to authenticate to VMs provides you with a way to centrally control and enforce policies. Tools like Azure Role-Based Access Control (RBAC) and Azure AD Conditional Access allow you to control who can access a VM. This Blog shows you how to create and configure a Windows Server 2019 VM to use Azure AD authentication and how to remove the Azure AD join and switch back to Active directory Domain join.

The following Windows distributions are currently supported during the preview of this feature:

  • Windows Server 2019 Datacenter
  • Windows 10 1809 and later

So the machine below is in a workgroup but Azure AD joined. on a server is it not visible that the machine is Azure AD joined in the UI.

image

In the Configuration properties in an Azure VM we can set the following properties. Login with AAD credentials. This is during creation of the new VM that way the VM is directly Azure AD joined.

image

Just deployed a new VM. and this VM is Azure AD joined, but what if you want to domain join this machine can we do a hybrid domain join for short NO.

image

Remember Some options only work if you have a P1 or a P2 Azure AD license here you can find the differences https://azure.microsoft.com/en-us/pricing/details/active-directory/

image

Looking at the devices in the Azure AD devices we can see the Server is Azure AD Joined.

image

Giving Access to the VM can be based on RBAC

Two RBAC roles are used to authorize VM login:

  • Virtual Machine Administrator Login: Users with this role assigned can log in to an Azure virtual machine with administrator privileges.
  • Virtual Machine User Login: Users with this role assigned can log in to an Azure virtual machine with regular user privileges.

To allow a user to log in to the VM over RDP, you must assign either the Virtual Machine Administrator Login or Virtual Machine User Login role. An Azure user with the Owner or Contributor roles assigned for a VM do not automatically have privileges to log in to the VM over RDP. This is to provide audited separation between the set of people who control virtual machines versus the set of people who can access virtual machines.

Select the VM and choose IAM press Add and add role assignment. just as you do with other workloads.

image

image

Or use the Azure CLI

$username=(az account show –query user.name –output tsv)

$vm=(az vm show –resource-group rsg-adjoin001 –name 2019vmadjoin –query id -o tsv)

az role assignment create  –role "Virtual Machine Administrator Login" –assignee $username –scope $vm

image

But what If we want to do a Domain join ?

There is no hybrid domain join and no console unjoin. Redeploy would not be the best option right.

image

With the DSRegCmd /Leave we can unregister the VM from the Azure AD.

image

now back to the Domain join without a reboot we can join the VM direct to the Classic Active directory.

image

Remember a reboot is needed for this.

image

Now the VM is normal AD joined.

This option is still in preview and after removing the Azure AD still shows that the VM is Azure Ad joined, it seems there is no trigger to remove the AADLoginForWindows extention in the VM.

The hybrid join could me a great addition to make VM’s connectable with Azure MFA. But for now we can assign policy’s and rules.


Follow Me on Twitter @ClusterMVP

Follow My blog https://robertsmit.wordpress.com

Linkedin Profile Robert Smit MVP Linkedin profile

Google  : Robert Smit MVP profile

Azure VM vs Disk vs Costs, Does Size matter ? or a Higher price for better specifications #Azure #Storage #Performance

Building in Azure is easy and the wizard takes you to all the steps and you have a working VM. choosing the right size is different often it has a link to the on premise world 4 core CPU and 8 GB memory. and the disk I need 1 TB disk space. All simple but then things get complicated the performance needs to be better CPU is fine Memory well 60 %  plenty of disk space. Bigger VM perfect.

Still slow Whole VM runs at 20-60% users are complaining must be this Azure thing someone else his computer runs slow.

I often hear this. But is it really slow or is your measurement wrong ?

When you pick a machine on premise what do you take performance or Cost ? <> performance and then cost right and at the end you settle with the cost vs. performance.

But in Azure what do you take performance or Cost ?<> 100% Costs, VM’s are expensive.  This is not always wrong but sometimes is paying a bit more the best approach

In my sample here I show you the performance in a Disk with different machine types, and not picking the right components doesn’t give you the right performance. but it may well function on your workload, but then you may pay to much for you over sized configuration.

In my sample I need a VM with 300 IOPS and one with 4000 IOPS and I need one with 27000 IOPS CPU and Memory are in this case not important as it is more i/o intensive.

I pick a default Azure VM an D machine, put some disks to the machine one HDD-S30 ,SSD-E30 ,SSD-P30,SSD-P60 


VM Type Disk Type MiB/s I/O per s
Standard D2s v3 (2 vcpus, 8 GiB memory) HDD-S30 2.01 514.23
  SSD-E30 2.21 566.27
  SSD-P30 13.29 3403.51
  SSD-P60 12.33 3157.46


First goal met 500 IOPS and an cheap machine but this could also an Azure B type VM much cheaper. then I wonder why use SSD over HDD for the IOPS it’s the same speed and latency there is a point SDD are performance steady, but for normal workload. Costs If you have a lot of transactions then SDD may be cheaper. A fact is nobody knows how expensive the HDD disk are, have you ever calculated the Storage transactions ?

image

below is a overview of the disk latency.

25th |    100.325 |    N/A |    100.325 HDD-S30

25th |    100.012 |   N/A |    100.012 SSD-E30

25th |      4.545 |    N/A |      4.545   SSD-P30

Comparing all the SSD disks and pick the right performance is not hard Microsoft did a great job on explaining this. on Microsoft docs

Disk size

Premium SSD sizes P30 P40 P50 P60 P70 P80
Disk size in GiB           1,024 2,048 4,096 8,192 16,384 32,767
IOPS per disk           Up to 5,000 Up to 7,500 Up to 7,500 Up to 16,000 Up to 18,000 Up to 20,000
Throughput per disk           Up to 200 MiB/sec Up to 250 MiB/sec Up to 250 MiB/sec Up to 500 MiB/sec Up to 750 MiB/sec Up to 900 MiB/sec

When you provision a premium storage disk, unlike standard storage, you are guaranteed the capacity, IOPS, and throughput of that 


When you provision a premium storage disk, unlike standard storage, you are guaranteed the capacity, IOPS, and throughput of that

that is interesting In my D2 machine and with a P30 I got only 3400 IOPS, so this is wrong ? Well according to the disk but the VM can only deliver 3200 IOPS with the 3400 IOPS delivered its perfectly normal then.

image


The same test again with a better Azure VM and the same disks.


VM Type Disk Type MiB/s I/O per s
Standard DS3 v3 (4 vcpus, 14 GiB memory) HDD-S30 2.01 514.01
  SSD-E30 2.21 566.63
  SSD-P30 21.58 5523.51
  SSD-P60 51.00 13056.39


The requirements are there 5500 Iops for a disk that need to deliver 5000 IOPS that’s good. but what about the P60 disk , again a had cap to the VM max of 12800 IOPS

The latency is not that different for this you need a different kind of VM

25th |    100.256 |        N/A |    100.256  HDD-S30

25th |    100.008 |        N/A |    100.008 SSD-E30

25th |      4.416 |        N/A |      4.416 SSD-P30

25th |      2.135 |        N/A |      2.135  SSD-P60

Comparing the Azure VM’s selected on IOPS and select the right machine

imageimage


selecting the F4 VM that can deliver 16000 lops according the sheet .

VM Type Disk Type MiB/s I/O per s
Standard F4s (4 vcpus, 8 GiB memory) HDD-S30 2.01 514.01
  SSD-E30 2.21 566.63
  SSD-P30 21.58 5523.51
  SSD-P60 50.85 13018.46


Did not get the 16.000 lops in fact it produce almost the same results ad the DS3 only double the costs.

SSD-P60 latency measurement 4k blocks vs 64K blocks

25th |      2.171 |        N/A |      2.171

25th |      3.088 |        N/A |      3.088  <> 64kblocs

So this strange big machine still not hitting the limits CPU and memory is low. Seems good but not the performance

image

image

Checking the Microsoft site : https://docs.microsoft.com/en-us/azure/virtual-machines/windows/sizes-compute

You can see a different specs result. this means the machine can’t deliver the IOPS and the Size table thinks he can. Results are bad.

Standard_F4s_v2 4 8 32 8 8000 / 63 (64) 6400 / 95 2 / 1750


Then lets pick a Azure VM than can deliver the iops. a F16 big VM costly but can it deliver I compare both tables In the Azure portal and the Docs

  But on the other side on the Docs https://docs.microsoft.com/en-us/azure/virtual-machines/windows/sizes-compute

Standard_F16s_v2 16 32 128 32 32000 / 255 (256) 25600 / 380 4 / 7000


VM Type Disk Type MiB/s I/O per s
Standard F16s v2 (16 vcpus, 32 GiB memory) HDD-S30 2.01 514.09
  SSD-E30 2.21 566.63
  SSD-P30 21.60 5529.96
  SSD-P60 63.76 16321.29


This looks OK now 16000 IOPS.

But what If I build a stripe set from the SSD-P30 and SSD-P60 and HDD-S30 and SSD-E30 what would be the iops ? (it’s a bad idea to mix different disk types this is just a sample)

What if we create a stripe set ?

image

Worse performance than if I user the SSD-P60 alone. Bad config to do this. 


HDD and SSD

image

Both Disks have around 500 IOPS each and now they can produce a 1000 IOPS that’s not bad

But what happens if I combine all the disks into a Storage space direct ? combining all the disk you have and build a new disk JBOD.

image

Also a Bad Idea and a waste of resources and Money an P60 disk combined with a S30

That’s all about the little side step, but it keeps me thinking…. -What if

Below is a list with similar iops performance  And Instead of using 1 SSD-P60 I’ll use 3 disks on paper I should have 3x 16000 IOPS = 48000 IOPS and 3x 500MB/s =1500 MB/s that is massive right. stripe set or Storage space or storage space direct ? all valid options but what machine do I need to handle the performance.

image

I selected 3 types a E32,DS5 and a DS14 all with big price difference but similar specs .

Standard_E32s_v3 2 32 256 512 32 64000 / 512 (800) 51200 / 768 8 / 16000
Standard_DS5_v2 16 56 112 64 64000 / 512 (688) 51200 / 768 8 / 12000
Standard_DS14_v2 3 16 112 224 64 64000 / 512 (576) 51200 / 768 8 / 12000


First I build a Storage Pool on the DS5_V2

image

Nice Capacity good latency and decent performance a round 29000 IOPS of 3 disks, in a Mirror set I’ll loose a disk so the performance is good better than I expected.  To hit the limits I should add 2 more disks to this config and see if they can handle the performance.

25th |      2.025 |        N/A |      2.025

image

I’ll run the same test on a E32-8s_v3

Bigger VM much more performance, higher price.

image

So overall the cheaper VM can produce the same disk performance. but the machine is $1000 cheaper per month. Again it depends what you are doing with the VM

Now the same configuration with Storagespaces Direct just to see if the performance is better, keep in mind that every run the machine performance can be a bit different so in the same range I see this as the same performance.

The S2D results on a E32 VM

image

And even a step higher an expensive VM with 432 GB memory. With an S2D Cluster.


image

So same performance when Running a StorageSpace or S2D cluster and no change on the machine type. in fact the DS5 machine is slightly better. it saves $2000 per month. If you don’t need the CPU and memory from the VM.

image

image

So size does matter but it depends on what size you are looking right. Azure is like Lego but different. Combining the pieces makes a great solution.

Below I created a table Cost vs performance, I also compared the datasheet in the azure portal to the DOC pages and I think you should keep this page as a reference. https://docs.microsoft.com/en-us/azure/virtual-machines/windows/sizes-memory

image

This shows you that in complex configurations there is no one size fits all and it comes to testing and adjusting, Tools may help you but picking the right VM size and choose the right storage can take some time. As in this I only compared disks but what if I choose Netapp files or some other disks like ultra SSD’s

And Now I did this config with 3 P60 disk that cost  $1000 each = $3,121.92 (in azure Calculator) it gets me ~30.000 IOPS

Now On the DS5 machine a 2 way mirror Auto created.

image

It nags me that I can’t get the max from the VM, the must be something wrong in my configuration. lets do some quick testing change VM and Disk types

With 6 times a SSD-P30 disk  I’ll get 27.000 IOPS on the DS5 Machine

image

When using a Stripeset this hits the VM limit of 768 true put. Less IOPS but more speed. So Configuration is also KEY in the used hardware.

image

Lets tweak the config a bit and see if we can pass the 50.000 Iops and hit the machine limit.

image

With read cache enabled and 8 P30 disks. that’s not bad right.

image

The P40 disks have 7500 IOPS each will this break the record ?  (6x P40 disk storage space)

image

First test same result a bit lower, but there is more to get. Testing now With 8 P40 disks

(8x P40 disk storage space)

image

(8x P40 disk storage space) Manual configuration.

image

(8x P40 disk storage space) Manual configuration. with 6 columns

image

That’s not bad the DS5 hits the limit.

On Microsoft Ignite 2015 Mark Russinovich did a demo, where he showed a virtual machine with Premium Storage that hit over 64,000 IOPS. Well This beats the record but the Azure hardware is much better now right.

Lets Switch to some big Azure VM

image

64 Cores lets see If I can use some of these cores in the S2D config.

image

image

Oh ok it seems I need more cores or less workload on this.  But easily hit the IOPS limit on this machine.

image

image


Overall in this is what do you need and test this also with a different configuration. Not only on price but also on performance.  In the first section I used 3x a P60 disk cost $3.000 a even better result I get with 8x P30 disk cost $1.000

Picking the right configuration can only be don based on testing and create some references for you. Azure machines and storage is changing all the time its getting better all the time. It all depends on your workload but there is no one size fits all !


Follow Me on Twitter @ClusterMVP

Follow My blog https://robertsmit.wordpress.com

Linkedin Profile Robert Smit MVP Linkedin profile

Google  : Robert Smit MVP profile

How to install Azure Portal app on Windows server 2019 #ws2019 #Azure #portal #winserv #Cloud #Hybrid

As Windows Server 2019 Still holds Internet Explorer and no Edge Chromium or other browser. therefore all initial internet contact is done by the Internet Explorer. This can be annoying when you want to do something on the server and connect to Azure and first you need to install another browser.

This is just a quick blog on the Azure portal app, as this could be handy on any machine without using the browser.

Or you can download the Azure portal app.

When opening the IE browser and go to https://Portal.azure.com

You will see this, the option to download the Application to manage the portal.

image

Agreeing on the Terms and download

image

The Azueportalinstaller can also be deployed by SCCM or intune if you want. its not only an application that can be used on older machines.

image

The setup is easy and you only need to logon.

image

Use your Azure credentials and you good to go.

image


image


Follow Me on Twitter @ClusterMVP

Follow My blog https://robertsmit.wordpress.com

Linkedin Profile Robert Smit MVP Linkedin profile

Google  : Robert Smit MVP profile

Windows Server 2019 Cluster vs Windows Server 2016 Cluster #ws2019 #winserv #Cluster

This post is already a long pending post, now that there is an updated ISO with 1903 thought it is time to dust off this draft post.

Originally it was more an overview on what is change and a first impression, but then the server 2019 got postponed.

On the MSDN there is the ISO 1903 Or download the evaluation version https://www.microsoft.com/en-us/evalcenter/evaluate-windows-server-2019

imageimage

In the mean time on Microsoft doc’s there are already some overviews and these are showing all the details on what is changed between Server 2008,2012,2016 and 2019

Summary of hybrid capabilities when you extend your datacenter to Azure Source : https://www.microsoft.com/en-us/cloud-platform/windows-server-comparison

Feature description

Windows Server 2008 R2

Windows Server 2012 R2

Windows Server 2016

Windows Server 2019

Storage Migration Service helps to inventory and migrate data, security, and configurations from legacy systems to Windows Server 2019 and/or Azure.

Not supported in Windows Server 2008 R2 Not supported in Windows Server 2012 R2  Feature unavailable in Windows Server 2016 Fully supported in Windows Server 2019

Synchronizing file servers to Azure helps centralize your organization’s file shares in Azure Files while keeping the flexibility, performance, and compatibility of an on-premises file server.

 Feature unavailable in Windows Server 2008 R2  Included in Windows Server 2008 R2  Included in Windows Server 2016  Included in Windows Server 2019

System Insights brings local predictive analytics capabilities native to Windows Server. These predictive capabilities, each backed by a machine-learning model, locally analyze Windows Server system data to provide high-accuracy predictions that help reduce the operational expenses associated with reactively managing Windows Server instances.

Not supported in Windows Server 2008 R2 Not supported in Windows Server 2012 R2 Not supported in Windows Server 2016  Included in Windows Server 2019

Azure network adaptor easily connects to Azure virtual networks. Windows Admin Center performs the heavy lifting of configuring the VPN to a new network adapter that will connect Windows Server 2019 to a point-to-site Azure virtual network VPN.

Not supported in Windows Server 2008 R2 Not supported in Windows Server 2012 R2 Not supported in Windows Server 2016 Fully supported in Windows Server 2019

VM protection replicates workloads running on physical and virtual machines (VMs) from a primary site to a secondary location.

Not supported in Windows Server 2008 R2 Fully supported in Windows Server 2012 R2 Fully supported in Windows Server 2016 Fully supported in Windows Server 2019


Because Windows Server 2019 is a Long-Term Servicing Channel (LTSC) release, it includes the Desktop Experience. (Semi-Annual Channel (SAC) releases don’t include the Desktop Experience by design; they are strictly Server Core and Nano Server container image releases.) As with Windows Server 2016, during setup of the operating system you can choose between Server Core installations or Server with Desktop Experience installations.

image

Failover Clustering :
Here’s a list of what’s new in Failover Clustering.

  • Cluster sets
  • Azure-aware clusters
  • Cross-domain cluster migration
  • USB witness
  • Cluster infrastructure improvements
  • Cluster Aware Updating supports Storage Spaces Direct
  • File share witness enhancements
  • Cluster hardening
  • Failover Cluster no longer uses NTLM authentication
  • Application Platform


Setting up the Cluster is still the same, In powershell we install the feature and install some extra components like the file server and deDup etc

Get-WindowsFeature Failover-Clustering
install-WindowsFeature "Failover-Clustering","RSAT-Clustering","FS-FileServer","FS-Data-Deduplication","Print-Server","Containers","Storage-Replica"-IncludeAllSubFeature

install-WindowsFeature "Failover-Clustering","RSAT-Clustering","FS-FileServer","FS-Data-Deduplication","Print-Server","Containers","Storage-Replica","SMS","SMS-Proxy"-IncludeAllSubFeature


when installing the Cluster Components and creating the cluster you will see no difference.

Cluster based on Server 2016

image

Cluster based on server 2019

image

USB witness

You can now use a simple USB drive attached to a network switch as a witness in determining quorum for a cluster. This extends the File Share Witness to support any SMB2-compliant device.

image

This is a nice option, maybe not real enterprise but for small setups this is handy.

Failover Clusters no longer use NTLM authentication. Instead Kerberos and certificate-based authentication is used exclusively. There are no changes required by the user, or deployment tools, to take advantage of this security enhancement. It also allows failover clusters to be deployed in environments where NTLM has been disabled.

Clustering FileServer Data Deduplication

ReFS is the Recommended configuration for Storage spaces and can also configured with Data Deduplication

https://robertsmit.wordpress.com/2018/02/21/clustering-fileserver-data-deduplication-on-windows-2016-step-by-step-sofs-winserv-refs-windowsserver2016-dedupe/

image

Below the Server 2016 layout with no dedup option on the storage

image


On the sizing no big changes that we saw as a limit in the day to day setup. More storage can be added, A lot more.

This could be handy in large storage clusters.

image


When looking at the Cluster settings there are some differences, this is all default I did not change anything. also handy when you want to know the original setting.

On windows 2019 vs Windows 2016

image


The CSV cache is now enabled by default to boost virtual machine performance. MSDTC now supports Cluster Shared Volumes, to allow deploying MSDTC workloads on Storage Spaces Direct such as with SQL Server. Enhanced logic to detect partitioned nodes with self-healing to return nodes to cluster membership. Enhanced cluster network route detection and self-healing.

image

More options and better to tune in the Cluster site.

Intra-cluster communication over Server Message Block (SMB) for Cluster Shared Volumes and Storage Spaces Direct now leverages certificates to provide the most secure platform. This allows Failover Clusters to operate with no dependencies on NTLM and enable security baselines.

Cluster Aware Updating (CAU) is now integrated and aware of Storage Spaces Direct, validating and ensuring data resynchronization completes on each node. Cluster Aware Updating inspects updates to intelligently restart only if necessary. This enables orchestrating restarts of all servers in the cluster for planned maintenance.

Moving Cluster from one domain to an other is now days also a scenario, with moving to the cloud consolidation and domain change is often a part of the migration.

Failover Clusters can now dynamically move from one Active Directory domain to another, simplifying domain consolidation and allowing clusters to be created by hardware partners and joined to the customer’s domain later.

Storage Replica is now available in Windows Server 2019 Standard Edition (with some limits)

There are some big list on the changes see for your self on what is change in Window Server 2019, it could be your choice during the migration of Windows server 2008 R2 EOL.

What’s new in Windows Server 2019 :

Windows Server Evaluations :  https://www.microsoft.com/en-us/evalcenter/evaluate-windows-server-2019


Follow Me on Twitter @ClusterMVP

Follow My blog https://robertsmit.wordpress.com

Linkedin Profile Robert Smit MVP Linkedin profile

Google  : Robert Smit MVP profile

step by step Windows Server 2019 File Server clustering With powershell or GUI #Cluster #HA #Azure #WindowsAdminCenter #WindowsServer2019

Installing the Cluster is easy now days. But just this I post a little blog on how to do this, In my blog stats it shows that the 2012 post is still very active , so time for an update to Windows Server 2019. in the creation there isn’t much changed, it gets only easier. but If you still not in PowerShell you got more clicks to do an less Coffee. And Windows Admin Center is also a great addition to manage a cluster. This blog post is also usable in Azure Only you need to add Storagespacesdirect and a CSV file share. 

Just install a bare metal (VM) windows Server 2019 and do a domain join and the fun can start.

Installing the Cluster Feature in powershell

Install-WindowsFeature –Name Failover-Clustering –IncludeManagementTools

#Create cluster validation report
Test-Cluster -Node MVP19-01,MVP19-02

#Create new Cluster
New-Cluster -Name MVP1911-27 -Node MVP19-01,MVP19-02 -NoStorage -StaticAddress "10.255.255.45"

#place witness file on USB device from my router

Set-ClusterQuorum -FileShareWitness \\SERVER\SHARE -Credential $(Get-Credential)

Now that the basic cluster is ready we start with the HA share

image

File share witness enhancements We enabled the use of a file share witness in the following scenarios:

  • Absent or extremely poor Internet access because of a remote location, preventing the use of a cloud witness.
  • Lack of shared drives for a disk witness. This could be a Storage Spaces Direct hyperconverged configuration, a SQL Server Always On Availability Groups (AG), or an * Exchange Database Availability Group (DAG), none of which use shared disks.
  • Lack of a domain controller connection due to the cluster being behind a DMZ.
  • A workgroup or cross-domain cluster for which there is no Active Directory cluster name object (CNO). Find out more about these enhancements in the following post in Server & Management Blogs: Failover Cluster File Share Witness and DFS.

    We now also explicitly block the use of a DFS Namespaces share as a location. Adding a file share witness to a DFS share can cause stability issues for your cluster, and this configuration has never been supported. We added logic to detect if a share uses DFS Namespaces, and if DFS Namespaces is detected, Failover Cluster Manager blocks creation of the witness and displays an error message about not being supported.

that’s it the cluster is created, we can start with the File server

Next is installation of the file server role

image

A restart is needed! After the restart we can build the cluster with the HA file share

$servers = ("MVP19-01", "MVP19-02") 
foreach ($server in $servers) {Install-WindowsFeature -Name file-services -ComputerName $server}

Now that the File Server Role is added we can add the Disk. Or use a disk that you already added before.

First we need to add a disk this can be done in the Failover Cluster manager or with PowerShell

image image

Get-ClusterAvailableDisk | Add-ClusterDisk

image

The Roles are there and the Disk is added

imageimage

Next step is adding the File server Role to the Cluster and add the HA File Share.

In this case I have a fail over disk and I use the File Server for general use.

image

image image

So when adding the Disk it is not showing the disk. This is The disk is added to the cluster but the disk isn’t formatted!

image

Keep in mind that formating the cluster disk while it is online is not possible. You need to set the disk in maintenance mode else the format will fail.

image image

So after the disk format we will see the Disk appear and can be added to the File server


imageimage

After this the File server is up and running. As you can see the setup is screen intense, building this with PowerShell is a lot faster.

Powershell

add-ClusterFileServerRole -Storage "Cluster Disk 1" -Name MyFiles

New-SmbShare -Name "Data" -Path "J:\Data" -EncryptData $True

Quick steps with powershell and even the share is created and encrypted

image

Next step is adding the file share.

image

go for the Quick setup

imageimage

Pick the disk and select the folder with the data on the disk, if there is no data then create a folder that will hold the data later.

image

as you can see the UNC path from the File Server.

image image

As you can see the settings can be adjusted for you needs and also set the right access, and keep in mind this needs to be don on the Cluster Level!

image

All Done

image

So creating a File Server and 2 file shares is Click intensive if you don’t use PowerShell.

But What about Windows Admin Center ? yes that would be an option also except here you can’t create a cluster role.

cluster management in Windows Admin Center

image

You can create a new role but no file server /share etc.

But when the share is created and running like now you can use Windows Admin Center for migration the data to the file share.

image

But more and more options are coming in Windows Admin Center below are some links that you can use to add your request to the UserVoice

https://docs.microsoft.com/en-us/windows-server/manage/windows-admin-center/use/manage-failover-clusters

More Coming

Failover cluster management in Windows Admin Center is actively under development and new features will be added in the near future. You can view the status and vote for features in UserVoice:

Feature Request

Show more clustered disk info

Support additional cluster actions

Support converged clusters running Hyper-V and Scale-Out File Server on different clusters

View CSV block cache

See all or propose new feature

+++++++++++++++


Follow Me on Twitter @ClusterMVP

Follow My blog https://robertsmit.wordpress.com

Linkedin Profile Robert Smit MVP Linkedin profile

Google  : Robert Smit MVP profile

Step by Step Server-to-server storage replication with Windows Server 2019 Storage Replica #WindowsAdminCenter #StorageReplica #WindowsServer2019 #ReFS #SR #Azure

In the old days all File servers where on one place, and if you want to replicate data you needed a extra tool to do this. Now days its already build in into Windows server. Storage replica can be used in several ways, replicate data from one Cluster to another or to Azure. but in this case I do a server to server replication as not everyone has a cluster.

For moving data to the Cloud there are currently several other applications like Azure file sync or Azure Migrate https://docs.microsoft.com/en-us/azure/migrate/migrate-overview Blog about Azure File Sync https://robertsmit.wordpress.com/2017/09/28/step-by-step-azure-file-sync-on-premises-file-servers-to-azure-files-storage-sync-service-afs-cloud-msignite/

Storage Replica is Windows Server technology that enables replication of volumes between servers or clusters for disaster recovery. It also enables you to create stretch failover clusters that span two sites, with all nodes staying in sync.

Storage Replica supports synchronous and asynchronous replication:

    • Synchronous replication mirrors data within a low-latency network site with crash-consistent volumes to ensure zero data loss at the file-system level during a failure.
    • Asynchronous replication mirrors data across sites beyond metropolitan ranges over network links with higher latencies, but without a guarantee that both sites have identical copies of the data at the time of a failure.

Storage Replica allows more efficient use of multiple datacenters. By stretching clusters or replicating clusters, workloads can be run in multiple datacenters for quicker data access by local proximity users and applications, as well as better load distribution and use of compute resources. If a disaster takes one datacenter offline, you can move its typical workloads to the other site temporarily.

Storage Replica may allow you to decommission existing file replication systems such as DFS Replication that were pressed into duty as low-end disaster recovery solutions. While DFS Replication works well over extremely low bandwidth networks, its latency is very high – often measured in hours or days. This is caused by its requirement for files to close and its artificial throttles meant to prevent network congestion. With those design characteristics, the newest and hottest files in a DFS Replication replica are the least likely to replicate. Storage Replica operates below the file level and has none of these restrictions.

Storage Replica also supports asynchronous replication for longer ranges and higher latency networks. Because it is not checkpoint-based, and instead continuously replicates, the delta of changes will tend to be far lower than snapshot-based products. Furthermore, Storage Replica operates at the partition layer and therefore replicates all VSS snapshots created by Windows Server or backup software; this allows use of application-consistent data snapshots for point in time recovery, especially unstructured user data replicated asynchronously.

The Setup I used two servers both domain joined, And there are different ways to configure the Storage Replica, the easy way and the 10 second way.

Diagram showing a server in Building 5 replicating with a server in Building 9

First we are installing the Storage replica feature and the File server Role.  The Storage replica feature needs a reboot.

image

Or use Powershell

install-WindowsFeature “Storage-Replica” –IncludeAllSubFeature

If you don’t know the module name you can find it easily

install-WindowsFeature "Storage-Replica" -IncludeAllSubFeature

A reboot is needed.

install-WindowsFeature "Storage-Replica" -IncludeAllSubFeature

Doing this server by server is not handy, So placing this together saves us some time.

$Servers = “Building-5”,”Building-9”

$Servers | ForEach { Install-WindowsFeature -ComputerName $_ -Name Storage-Replica,FS-FileServer -IncludeManagementTools -restart }

The –restart does an automatic restart if this is needed.

image

Storage Replica prerequisites

    • Active Directory Domain Services forest.
    • Storage Spaces with SAS JBODs, Storage Spaces Direct, fibre channel SAN, shared VHDX, iSCSI Target, or local SAS/SCSI/SATA storage. SSD or faster recommended for replication log drives. Microsoft recommends that the log storage be faster than the data storage. Log volumes must never be used for other workloads.
    • At least one Ethernet/TCP connection on each server for synchronous replication, but preferably RDMA.
    • At least 2GB of RAM and two cores per server. (with less memory the replication won’t start)
    • A network between servers with enough bandwidth to contain your IO write workload and an average of 5ms round trip latency or lower, for synchronous replication. Asynchronous replication does not have a latency recommendation.

As there is no Gui on the replica part we need to configure this by PowerShell or with the new Windows Admin Center

Both our servers had Two extra disks. One log and Data Disk.

image

image

    • You must create two volumes on each enclosure: one for data and one for logs.
    • Log and data disks must be initialized as GPT, not MBR.
    • The two data volumes must be of identical size.
    • The two log volumes should be of identical size.
    • All replicated data disks must have the same sector sizes.
    • All log disks must have the same sector sizes.
    • The log volumes should use flash-based storage, such as SSD. Microsoft recommends that the log storage be faster than the data storage. Log volumes must never be used for other workloads.
    • The data disks can use HDD, SSD, or a tiered combination and can use either mirrored or parity spaces or RAID 1 or 10, or RAID 5 or RAID 50.
    • The log volume must be at least 9GB by default and may be larger or smaller based on log requirements.
    • The File Server role is only necessary for Test-SRTopology to operate, as it opens the necessary firewall ports for testing.

As you can see there are some needs for the Replication As I show you below with the performance test why you need this.

First we are configuring the Disks on both servers. with some PowerShell commands but this can also be done with Disk manager.

Get-Disk | Where FriendlyName -eq ‘Msft Virtual Disk’

image

Get-Disk | Where FriendlyName -eq ‘Msft Virtual Disk’|Initialize-Disk -PartitionStyle GPT –PassThru

image

1..2 | % { Get-Disk $_ }| Where FriendlyName -eq ‘Msft Virtual Disk’|New-Partition -AssignDriveLetter -UseMaximumSize | Format-Volume -FileSystem ReFS -NewFileSystemLabel “SR01-disk” -Confirm:$false

image

I formatted the disk with ReFS and not with NTFS.

Now that the disks are in place we can start but before we start building the replica I want to make sure the connection and the network is fast and the server can deliver the performance we need.

Therefor I download a test tool Diskspd. https://aka.ms/diskspd

Important is that the network speed between the server is good as this is the life line for the storage replica. We can test the replication before the build things for real.

With this test tool we bring up a small load to test the server.

image

Using the Diskspd with the line below.

Diskspd.exe -c1g -d600 -W5 -C5 -b8k -t2 -o2 -r -w5 –i100 –j2 E:\test

Storage replica has a great test tool report. So with this we configure the test. Using Powershell

MD c:\temp 

Test-SRTopology -SourceComputerName “Building-5” -SourceVolumeName “e:” -SourceLogVolumeName “f:” -DestinationComputerName “Building-9” -DestinationVolumeName “e:” -DestinationLogVolumeName “f:” -DurationInMinutes 30 -ResultPath c:\Temp

#set output file
$outputfile=”$Env:TEMP”

Test-SRTopology -SourceComputerName “Building-5” -SourceVolumeName “e:” -SourceLogVolumeName “f:” -DestinationComputerName “Building-9” -DestinationVolumeName “e:” -DestinationLogVolumeName “f:” -IntervalInSeconds 5 -DurationInMinutes 30 -ResultPath $outputfile

#open output file
If (Test-Path $outputFile) { Invoke-Item $outputFile\TestSrTopologyReport.html } Else { Write-Host “FAILED: Output file not found: $url” -fore red }
Write-Host “Done” -ForegroundColor Cyan

imageimage

while running the Test-SRTopology  with the -DurationInMinutes 30  option we also run Diskspd.

Diskspd.exe -c1g -d600 -W5 -C5 -b8k -t2 -o2 -r -w5 –i100 –j2 E:\test

It is a 1 Gb file placed on our E drive that is our Data disk for replication.

imageimage

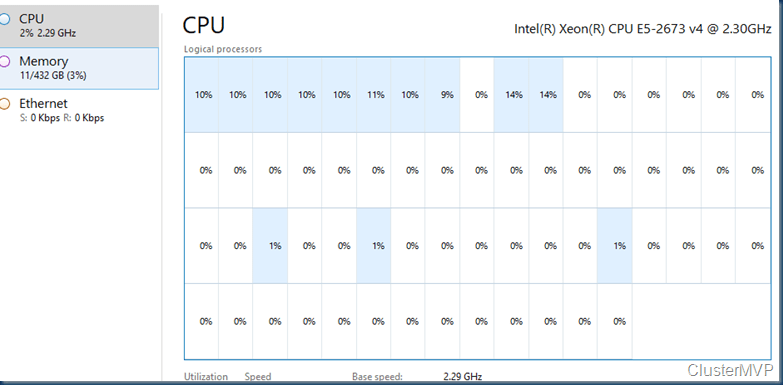
As you can see I have just one network adapter and no RDMA and in this config I hit the limit of the CPU and the network card max 4.4 Gbps not bad for a test config. (if you use a better machine in Azure Pick a Azure H-series those have RDMA

image

One CPU with 99% usage.

When the test is done the is a log file created  in    -ResultPath c:\Temp
Open the log file and detailed information is there about the test. this is why I choose 30 min duration.

image

Nice graph about the Data throughput, in this case not bad.

image

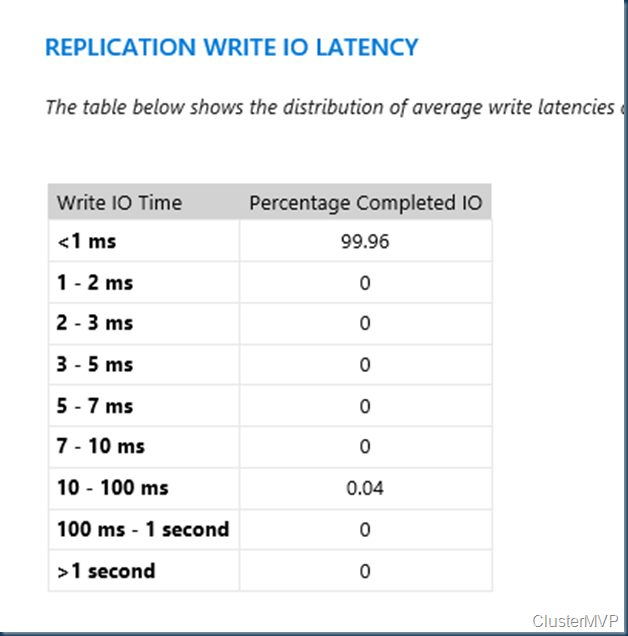
the Latency is always a issue this could change you from sync to async or more network adapters or better disks.  But for now it is good.

image

Log Volume Free Disk Space Test: The log volume F: in Building-5 has enough free space to hold the recommended log volume size of 8GB

Log Volume Free Disk Space Test: The log volume F: in Building-9 has enough free space to hold the recommended log volume size of 8GB

Storage replica has not that much PowerShell commands

#list all the commands
get-command *sr*

Setting up the actual replica is done with a long PowerShell command

The default log size is 8GB. Depending on the results of the Test-SRTopology cmdlet, you may decide to use -LogSizeInBytes with a higher or lower value.

New-SRPartnership -SourceComputerName “Building-5” –SourceRGName rg01 -SourceVolumeName “e:” -SourceLogVolumeName “f:” -DestinationComputerName “Building-9” –DestinationRGName rg02 -DestinationVolumeName “e:” -DestinationLogVolumeName “f:”

image

The default log size is 8GB. Depending on the results of the Test-SRTopology cmdlet, you may decide to use -LogSizeInBytes with a higher or lower value.

New-SRPartnership -SourceComputerName “Building-5” –SourceRGName rg01 -SourceVolumeName “e:” -SourceLogVolumeName “f:” -DestinationComputerName “Building-9” –DestinationRGName rg02 -DestinationVolumeName “e:” -DestinationLogVolumeName “f:” -LogSizeInBytes 1gb

image

here you can see the disk setup between both servers, the active side you can access the data disk, on the passive side the disk is not accessible.

Don’t place files on the Log disk.

To get replication source and destination state, use Get-SRGroup and Get-SRPartnership

Get-SRGroup

Get-SRGroup |fl *

image

Get-SRPartnership

image

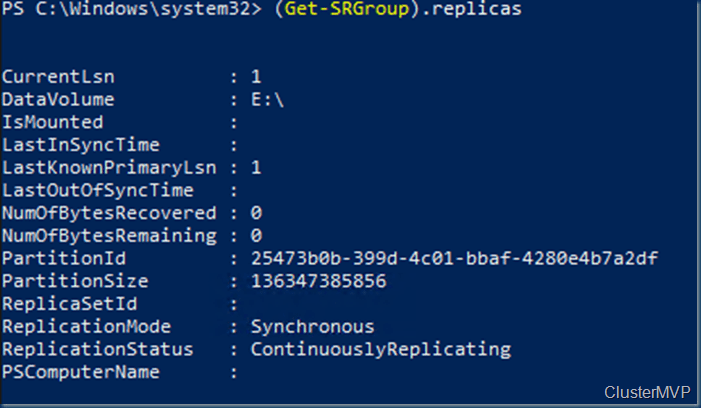
(Get-SRGroup).replicas

image

This is just after the creation so no data yet for the last time in sync.

New-SRPartnership -SourceComputerName “Building-5” –SourceRGName rg01 -SourceVolumeName “e:” -SourceLogVolumeName “f:” -DestinationComputerName “Building-9” –DestinationRGName rg02 -DestinationVolumeName “e:” -DestinationLogVolumeName “f:”

For troubleshooting there are some events that you can check, go to the event viewer and check for the Storage replica events.

image

Or check the events with PowerShell

Get-WinEvent -ProviderName Microsoft-Windows-StorageReplica -max 20

image

On the destination server, we can do the same or look for the events in the eventlog.

Get-WinEvent -ProviderName Microsoft-Windows-StorageReplica | Where-Object {$_.ID -eq “1215”} | fl

image

(Get-SRGroup).Replicas | Select-Object numofbytesremaining

There are also a lot of performance counters that can be viewed with PowerShell

Get-Counter -Counter “\Storage Replica Statistics(*)\Total Bytes Received”
Get-Counter -Counter “\Storage Replica Statistics(*)\Total Bytes Sent”
Get-Counter -Counter “\Storage Replica Statistics(*)\Avg. Network Send Latency”
Get-Counter -Counter “\Storage Replica Statistics(*)\Replication State”
Get-Counter -Counter “\Storage Replica Statistics(*)\Last Recovery Elapsed Time”
Get-Counter -Counter “\Storage Replica Partition I/O Statistics(*)\Number of times flush paused”
Get-Counter -Counter “\Storage Replica Statistics(*)\Number of Flushed Recovery Transactions”
Get-Counter -Counter “\Storage Replica Statistics(*)\Number of Recovery Transactions”
Get-Counter -Counter “\Storage Replica Statistics(*)\Number of Flushed Replication Transactions”
Get-Counter -Counter “\Storage Replica Statistics(*)\Number of Replication Transactions”
Get-Counter -Counter “\Storage Replica Statistics(*)\Number of Messages Received”
Get-Counter -Counter “\Storage Replica Statistics(*)\Number of Messages Sent”
Get-Counter -Counter “\Storage Replica Partition I/O Statistics(*)\Avg. App Write Latency”
Get-Counter -Counter “\Storage Replica Partition I/O Statistics(*)\Avg. App Read Latency”
Get-Counter -Counter “\Storage Replica Statistics(*)\Target RPO”
Get-Counter -Counter “\Storage Replica Statistics(*)\Current RPO”
Get-Counter -Counter “\Storage Replica Statistics(*)\Avg. Log Queue Length”
Get-Counter -Counter “\Storage Replica Statistics(*)\Current Log Queue Length”
Get-Counter -Counter “\Storage Replica Statistics(*)\Total Bytes Received”
Get-Counter -Counter “\Storage Replica Statistics(*)\Total Bytes Sent”
Get-Counter -Counter “\Storage Replica Statistics(*)\Avg. Network Send Latency”
Get-Counter -Counter “\Storage Replica Statistics(*)\Replication State”
Get-Counter -Counter “\Storage Replica Statistics(*)\Avg. Message Round Trip Latency”
Get-Counter -Counter “\Storage Replica Statistics(*)\Last Recovery Elapsed Time”
Get-Counter -Counter “\Storage Replica Statistics(*)\Number of Flushed Recovery Transactions”
Get-Counter -Counter “\Storage Replica Statistics(*)\Number of Recovery Transactions”
Get-Counter -Counter “\Storage Replica Statistics(*)\Number of Flushed Replication Transactions”
Get-Counter -Counter “\Storage Replica Statistics(*)\Number of Replication Transactions”
Get-Counter -Counter “\Storage Replica Statistics(*)\Max Log Sequence Number”
Get-Counter -Counter “\Storage Replica Statistics(*)\Number of Messages Received”
Get-Counter -Counter “\Storage Replica Statistics(*)\Number of Messages Sent”

these counters look like this

image

To remove the Replication we run the following command :

Get-SRPartnership Get-SRPartnership | Remove-SRPartnership Get-SRGroup | Remove-SRGroup

Or change the direction of the replication just run the PowerShell command

#move the replication direction from one site, use the

Set-SRPartnership -NewSourceComputerName “Building-9” -SourceRGName rg02 -DestinationComputerName “Building-5” -DestinationRGName rg01

Why not use Windows Admin Center ?

But all this PowerShell my fear you on using this. Good news than when using Windows Admin Center

Windows Admin Center is a locally deployed, browser-based app for managing servers, clusters, hyper-converged infrastructure, and Windows 10 PCs. It comes at no additional cost beyond Windows and is ready to use in production.

Get it here

When opening the Source Storage Replica server you will see a quick over view of you configuration

image

Easy switch replication direction.

imageimage

Notifications on the preformed actions

image

With an overview of the current configuration.

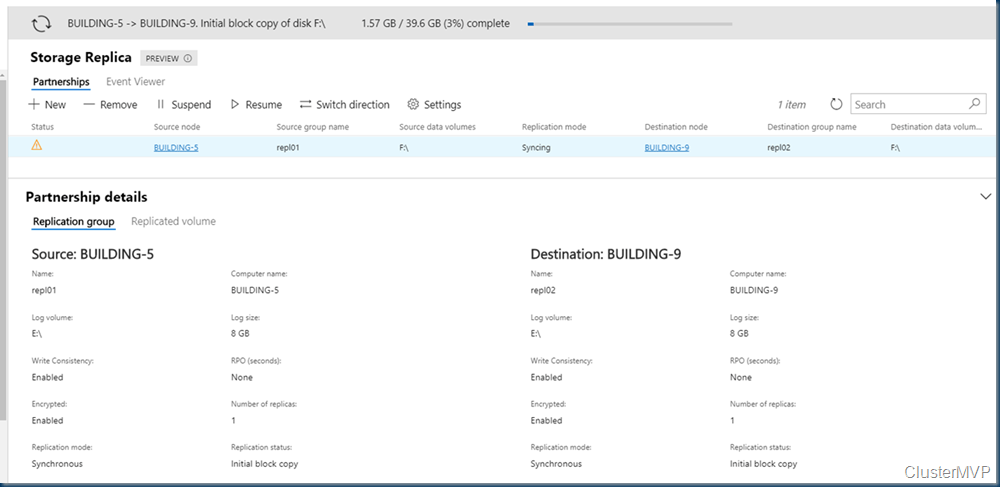
But the best part of Windows Admin Center is creating a new Replica. I removed the old replica and create a new one with the WAC.

Fill in the source and destination and your done.

imageimageimage

With the Admin center you got a GUI wrapper for creating the Storage replica, No PowerShell needed

image

So removing the replication or in case one server is dead.

Normaly you would do

Get-SRPartnership | Remove-SRPartnership –confirm:$false

this removes the replication and both locations will show the Data.

But if source server is no longer there this will not work

Remove-SRPartnership –Name RG02 -IgnoreRemovalFailure so that it breaks the partnership completely

Remove-SRPartnership [[-SourceComputerName] <String>] [-SourceRGName] <String> [-DestinationComputerName] <String> [-DestinationRGName] <String> [-IgnoreRemovalFailure] [-Force] [-CimSession <CimSession[]>] [-ThrottleLimit <Int32>] [-AsJob] [-WhatIf] [-Confirm] [<CommonParameters>]

here is the source link

https://docs.microsoft.com/en-us/powershell/module/storagereplica/remove-srpartnership?view=win10-ps

Clear-SRMetadata Removes unreferenced Storage Replica metadata.

There are more options in Windows Admin Center that could be useful to you just try it.

And if you want to use file replication to Azure take a look at the Azure File Sync https://docs.microsoft.com/en-us/azure/storage/files/storage-files-introduction

Step by Step Azure File Sync – on-premises file servers to #Azure Files Storage Sync Service

https://robertsmit.wordpress.com/2017/09/28/step-by-step-azure-file-sync-on-premises-file-servers-to-azure-files-storage-sync-service-afs-cloud-msignite/

Follow Me on Twitter @ClusterMVP

Follow My blog https://robertsmit.wordpress.com

Linkedin Profile Robert Smit MVP Linkedin profile

Google  : Robert Smit MVP profile

Upgrading Windows server 2016 Domain controller to Windows Server 2019 #windows2019 #ws2019

If you want to upgrade your domain controller and make this ready for server 2019. In this case I have only one Domain controller running server 2016.

Upgrading Windows server 2016 Domain controller to Windows Server 2019

image

When you do a Upgrade of your current Domain Controller you may get this message during the Setup of Windows server 2019

Upgrading Windows server 2016 Domain controller to Windows Server 2019

Go to the Source files of Windows server 2019 and look for ADPrep

Upgrading Windows server 2016 Domain controller to Windows Server 2019

In the command line  adprep.exe /forestprep /forest <domainname>

Upgrading Windows server 2016 Domain controller to Windows Server 2019

If you press any other key than the C it will quit the upgrade.

Press C


Upgrading Windows server 2016 Domain controller to Windows Server 2019

You can see a upgrade from schema 87 to 88

next step is a domain prep

Upgrading Windows server 2016 Domain controller to Windows Server 2019

ADPrep /domainprep /domain <domainname>


No reboot is needed, go back to the Setup press refresh and the setup will continue.

Upgrading Windows server 2016 Domain controller to Windows Server 2019

Depending on the Computer Speed you will see this

image

If the installation fails keep an eye on the error code. In this case I had a simulation of this and I skipped some updates.

Checked the code and see the solution.

image


https://support.microsoft.com/en-us/help/10587/windows-10-get-help-with-upgrade-installation-errors

An error that begins with 0xC1900101 is usually a driver error. If you see any of these error codes, try the following steps first to fix the problem. If these steps don’t work, see Resolve Windows 10 upgrade errors for more detailed technical info.

  • 0xC1900101 – 0x20004
  • 0xC1900101 – 0x2000c
  • 0xC1900101 – 0x20017
  • 0xC1900101 – 0x30018
  • 0xC1900101 – 0x3000D
  • 0xC1900101 – 0x4000D
  • 0xC1900101 – 0x40017
  1. Make sure that your device has enough space. Your device requires at least 16 GB of free space to upgrade a 32-bit OS, or 20 GB for a 64-bit OS. For more info, see Free up drive space in Windows 10.
  2. Run Windows Update a few times. Download and install any available updates in Windows Update, including software updates, hardware updates, and some third-party drivers. Use the troubleshooter for Windows 10 to fix Windows Update errors.
  3. Check third-party drivers and download any updates. You can find third-party drivers and installation instructions for any hardware you’ve added to your device on the manufacturer’s website.
  4. Unplug extra hardware. Remove all external storage devices and drives, docks, and other hardware you might have plugged into your device that isn’t needed for basic functionality.
  5. Check Device Manager for errors. Select the Start  button, then in the search box on the taskbar, type device manager. Choose Device Manager from the results. In the window that pops up, look for any device with a yellow exclamation mark beside it (you may have to select each category to switch to the list of devices). Press and hold (or right-click) the device name and select either Update Driver Software or Uninstall to correct the errors.
  6. Remove third-party security software. Make sure you know how to reinstall your programs and that any necessary product keys are on hand. Windows Defender will help protect your device in the meantime.
  7. Repair hard-drive errors. Select the Start  button, then in the search box on the taskbar, type command prompt. Choose Command Prompt from the list of results. In the window that pops up, type chkdsk/f C: and press the Enter key. Repairs automatically start on your hard drive, and you’ll be asked to restart your device.


I did do Option 2 and see the updates and installed it and retried the upgrade again and it worked without any issue.

image

image

After the update I did a restart for finishing the updates and another restart to make sure everything was fine then I restarted the upgrade successfully,


Follow Me on Twitter @ClusterMVP

Follow My blog https://robertsmit.wordpress.com

Linkedin Profile Robert Smit MVP Linkedin profile

Google  : Robert Smit MVP profile

Windows Server 2019 with Azure Network Adapter on Windows Admin Center Easy Azure VPN Connections #ANA #winserv #WindowsAdminCenter #WindowsServer2019

Windows Admin Center is a new, locally-deployed, browser-based management tool set that lets you manage your Windows Servers with no Azure or cloud dependency. Windows Admin Center gives you full control over all aspects of your server infrastructure and is particularly useful for managing servers on private networks that are not connected to the Internet.

With every new version there are new plugins or options in Windows Admin Center so you server management is getting easier and quicker. In this blog I will show you how to build a point to site VPN from a windows server 2019 with Windows Admin Center. You will need the Insiders preview For this. 

The Azure Network Adapter extension in Windows Admin Center "automates the configuration for the Azure Virtual Network gateway as well as the on-premises VPN client," Microsoft’s announcement explained.

Windows Server 2019 with Azure Network Adapter


The setup of point-to-site VPN connections is enabled by using an Azure Network Adapter network extension in Windows Admin Center. In the Server manager under network there is the option to add the Azure VPN

image

image

Do the Azure Network adapter (ANA) + and If you are not registered to Azure already in the Windows Admin Center then you need to do this first.

image

Do the Register Windows Admin Center to azure.

image

Do Register, Remember you need to enable Popups I your browser is you are not allowing this.

imageimage

Copy the Code and use this in the next login windows.

Windows Admin Center Azure ConnectionWindows Admin Center Azure Connection

Paste the Code into the screen and you are sign in into Azure.

Windows Admin Center Azure Connection

Windows Admin Center Azure Connection

The next steps are importand as most of us don read the text and just press next. ‘-)

We select a tenant what to use in the Azure portal. You can find the right ID in you Azure Active directory

image

image

By doing Properties you will see the Tenand ID

Windows Admin Center Azure Connection

Do register.

Windows Admin Center Azure Connection

As Most do next and complaining it doesn’t work see the text :

Require permissions then click Grand permissions on YES. So go to the Azure portal

Windows Server 2019 with Azure Network Adapter

You’ll need to visit the Azure portal to grant permissions to the application:

Go to the Azure AD app registration

Windows Server 2019 with Azure Network Adapter

Select ‘Settings’ > ‘Required permissions’, then click ‘Grant Permissions’ > ‘Yes’

Windows Server 2019 with Azure Network Adapter

If you for get this step the popup will fail and you can’t add the network.

Now we can really begin with the Azure VPN connection. #ANA

Windows Server 2019 with Azure Network Adapter Fill in the details your subscription and location with the network.


imageimage

If you don’t have a Azure network you need to create one first in the Azure portal, as a Point to site connection is connection to you azure network.

imageimage

After a few moments you can see in the Azure Portal that the Gateway is created.

Note: The creation could take much longer (~25 minutes) if the Azure Virtual Network gateway needs to be created. In this case it is I did not have a gateway.

imageimage

image

Once your Point-to-site VPN is “Connected” your server now has a connection to the Azure Virtual Network.  The server will be able to communicate to any Azure resources in the Virtual Network.

Windows Server 2019 with Azure Network Adapter

In the Windows Admin Center you get a nice detailed overview of the connection. Once your Point-to-site VPN is “Connected” your server now has a connection to the Azure Virtual Network.  The server will be able to communicate to any Azure resources in the Virtual Network.

Windows Server 2019 with Azure Network Adapter

On the Client you see also the extra networks. I created Two extra Point to Site connections. to two different subscriptions.  just to see if this was working.

To test if the connection was working I connect to a Azure VM by the internal IP.

Windows Server 2019 with Azure Network Adapter

image

The internal network IP of the Azure VM.

Windows Server 2019 with Azure Network Adapter

As you can see the Created certificates to Azure are on the Windows server 2019.

See how easy this is!


Ready to give it a shot!?  Try out Azure Network Adapter in the Windows Admin Center Version 1809!
Note: Windows Admin Center Version 1809 will be released in September.

Previously creating hybrid cloud connectivity required expertise in networking, certificate management, and even infrastructure setup and maintenance.  Now with the Azure Network Adapter in Windows Admin Center (version 1809), hybrid connectivity can be configured with the click of a button!  The Azure Network Adapter automates the configuration of the Azure Virtual Network gateway and VPN client installation for you!


Follow Me on Twitter @ClusterMVP

Follow My blog https://robertsmit.wordpress.com

Linkedin Profile Robert Smit MVP Linkedin profile

Google  : Robert Smit MVP profile

Upgrading and what is new in Windows Server 2019 Clustering #winserv #RunWS2019 #WindowsServer2019

This blog post is the first of a series on Windows Server 2019. #MSIgnite is coming and there will be a lot of new features coming. So in preparation I’ll show you what is changed and how to build things in Windows Server 2019. In this there is a upgrade and some new functions to the Cluster.

  1. Hybrid: Windows Server 2019 and Windows Admin Center will make it easier for our customers to connect existing on-premises environments to Azure. With Windows Admin Center it also easier for customers on Windows Server 2019 to use Azure services such as Azure Backup, Azure Site Recovery, and more services will be added over time.
  2. Security: Security continues to be a top priority for our customers and we are committed to helping our customers elevate their security posture. Windows Server 2016 started on this journey and Windows Server 2019 builds on that strong foundation, along with some shared security features with Windows 10, such as Defender ATP for server and Defender Exploit Guard.
  3. Application Platform: Containers are becoming popular as developers and operations teams realize the benefits of running in this new model. In addition to the work we did in Windows Server 2016, we have been busy with the Semi-Annual Channel releases and all that work culminates in Windows Server 2019. Examples of these include Linux containers on Windows, the work on the Windows Subsystem for Linux (WSL), and the smaller container images.
  4. Hyper-converged Infrastructure (HCI): If you are thinking about evolving your physical or host server infrastructure, you should consider HCI. This new deployment model allows you to consolidate compute, storage, and networking into the same nodes allowing you to reduce the infrastructure cost while still getting better performance, scalability, and reliability.


Installing the Windows Server 2019 is not different than 2016. There is an extra disk space warning menu.

imageimage

As an upgrade I want to keep my files.

imageimage

If you need to free up more disk space then there is a little warning. It may happen that the screen needs to refresh before you see the confirm option.

image

The upgrade is starting depending on the server speed it will take some time.image image

After the upgrade is done and the first logon the Server manager is starting and there is a popup of would you like to install Windows Admin Center.

image


Now that the upgrade is done we can take a look at the Cluster Changes. First if we check the Cluster Functional Level with PowerShell.

Get-Cluster | Select ClusterFunctionalLevel

image

This is now Version 10

  • Windows Server 2012 R2 functional level value of 8
  • Windows Server 2016 functional level value of 9
  • Windows Server 2019 functional level value of 10


Windows Server 2019 USB file Witness

The other big change is the placement of your witness files. this can now be on a USB device.

image

One of the quorum models for Failover Clustering is the ability to use a file share as a witness resource.  As a recap, the File Share Witness is designated a vote in the Cluster when needed and can act as a tie breaker in case there is ever a split between nodes (mainly seen in multi-site scenarios). See also my other blog posts https://robertsmit.wordpress.com/category/clustering/ 

This means NO kerberos, NO domain controller, NO certificates, and NO Cluster Name Object needed, and NO account needed on the nodes.

Simply plug your USB drive into the port in the router and get into your router’s interface.  In there, you can set up your share name, username, and password for access.  Use the PowerShell command above pointing it to the router and share, and you are good to go.  To answer your next question, this works with SMB 2.0 and above.  SMB 3.0 is not required for the witness type.

image

Setting up the share on my network device

Next is setting the Witness, this can only be done with PowerShell.

Set-ClusterQuorum -FileShareWitness \\SERVER\SHARE -Credential $(Get-Credential)

image

A credential popup, and type your account and password.

image

After this check your cluster and you can see the Witness is set.

image


Other Cluster Changes are there but not direct visible in the Gui PowerShell is needed/

When comparing the Storage space section there are some other options and more. Not all options are new some have a different value.


Windows Server 2019                                                                                                          Windows Server 2016

imageimage

One of these changes is S2DBusTypes in Windows Server 2016 it has a value of 0 but it could be changed if you had different storage. (not supported)

I created a blog post about this to add USB storage to build a SOFS with clustered storage spaces. So enabling the options I start Building My Scaleout File Server with My USB thumbdrive Storage.

https://robertsmit.wordpress.com/2015/05/18/building-usb-sofs-with-storage-spaces-direct-s2d-ws2016/

With a little help of this STORAGE_BUS_TYPE enumeration on MSDN we could do Fun things with some old disks.

https://msdn.microsoft.com/en-us/library/windows/desktop/ff800833(v=vs.85).aspx


In server 2019 it has a value of 396288 which is the the number of the supported disk types for Storage spaces direct.

S2DBusTypes                           : 396288

Changing these values is not best practice and could brake your cluster. Or bring unstable situations. 


Follow Me on Twitter @ClusterMVP

Follow My blog https://robertsmit.wordpress.com

Linkedin Profile Robert Smit MVP Linkedin profile

Google  : Robert Smit MVP profile