Start with Cloud Adoption Framework enterprise-scale landing zones #CAF #Azure #Cloud #MVPBuzz

The Cloud Adoption Framework for Azure enterprise-scale landing zone architecture varies between customers. So there is no one size fits all but there is a lot in common that can be reused next time.

Often I hear Azure Enterprise-scale is not for me it is enterprise. Wrong anyone can use the CAF and Azure Enterprise-scale. as it is modular by design. But if you have just 1 VM there is still some usage that you could use say the management groups or monitoring ,RBAC.

Source :

The enterprise-scale approach to construct landing zones includes three sets of assets to support cloud teams:

  • Design guidelines: Guide to the critical decisions that drive the design of the Cloud Adoption Framework for Azure enterprise-scale landing zone.
  • Architecture: Conceptual reference architecture that demonstrates design areas and best practices.
  • Implementations: Azure Resource Manager template of the architecture to accelerate adoption.

But how do we start with this what to build Well Microsoft made this easy there is a accelerator that I will explain below.

With this solution accelerator you can setup the foundation in one process.

Often there is this error showing even if you are an Azure subscription owner

You don’t have authorization to perform action ‘Microsoft.Resources/deployments/validate/action’.

This can be fixed by adding the user account to the Owner role at Tenant root scope. This can only be done with powershell assign Owner role at Tenant root scope (“/”) as a User Access Administrator to current user
New-AzRoleAssignment -Scope ‘/’ -RoleDefinitionName ‘Owner’ -ObjectId “user objectID”

go to the user and grab the object ID

Now that everything is ready we can start.

Choose where the instance needs to land, pick the proper region for your azure resources. If your default is west europe then choose west europe here

As I did not want to deploy it in a dedicated subscription, I’ll pick my own. the prefix for the management groups is based on the text that is visible later.

The management groups holds the subscriptions and policys can be placed on the management groups.

Here are the options for the log analytics and the policys. to keep a good governance you need logging and policy’s in the Azure Microsoft defender for cloud you can see later the policys and the secure score.

At this time I don’t want to use the devops pipeline. but it is a great add on and you can start from there with the pipeline deployment

Now you need to choose the deployment go for a hub spoke or Azure virtual wan. Depending on your needs, personally I’m a big fan of Azure virtual wan so I’ll choose this. As optional resources can be added as:

  • DDoS Protection Standard
  • Azure Private DNS Zones for Azure PaaS services
  • VPN and ExpressRoute Gateways
  • Azure Firewall

With these options you may need to choose the right sku and a proper subnet and or zone redundancy.

I choose the standard sku, this is without the IDS and TLS inspection, best option is choose premium.

Always use a NSG on your network, never never never add a vm direct to the web.

In the Enterprise-scale it is best practice to use multiple subscriptions, see also the enterprise-scale layout

Now that the deployment is ready we can view de Azure virtual wan with the firewall.

The deployment of the resources are easy to find as the prefix is used on all the resources

Looking at the log analytics and de policys, always check this. maybe you need to adjust the workload and or add extra settings on the workload the make things compliant.

Overall the template is a great starter, and yes you need to configure a lot more than just the foundation, but this gives you a good understanding on what is needed and what to connect and play with the resources.

Go here for the github template of the enterprise scale

Look on my blog for how to configure the VPN and Azure firewall.

Follow Me on Twitter @ClusterMVP

Follow My blog https://robertsmit.wordpress.com

Linkedin Profile Robert Smit MVP Linkedin profile

Google  : Robert Smit MVP profile

How to Create a Windows server 2022 SOFS Cluster on a VM #sofs #ws2022 #winserv #hyperv #Azure #Windows11 #WiMVP

Building a test lab is always depending on the resource you have. Building a Lab in Azure is giving you unlimited resources and the method on building this on your own laptop. I will use the GUI as much as possible else with a powershell script there is no fun in writing the blog. I’ll use a Windows 11 OS for this blog.

For now this blog will demonstrate how to create a scale out fileserver on a windows server 2022 platform.

First we have two domain member servers ws2022 01 / 02 .

Installing the Cluster Roles on the server with powershell or the GUI

Get-WindowsFeature Failover-Clustering
install-WindowsFeature “FS-FileServer”,”Failover-Clustering”,”RSAT-Clustering” -IncludeAllSubFeature -IncludeManagementTools -ComputerName “ws2022-01.mvp.local”,”ws2022-02.mvp.local”
#Create cluster validation report
Test-Cluster -Node ws2022-01,ws2022-02
Start-sleep 8
New-Cluster -Name ws2022CL01 -Node ws2022-01,ws2022-02 -NoStorage -StaticAddress “10.255.255.41”

Remember installing the fileserver may take a reboot, you can also do this at a later stage to avoid the extra reboot.

Now that the cluster is created we configure the cluster, Quorum and add storage to the Cluster.

Here is the difference between the local setup and an Azure setup or running on windows 11. Personally I run Windows server as desktop.

Adding storage to the VM is done in the hyper-v manager. If you run Server! If you run Windows 10 or 11 you will face the issue explained below

Make sure you use scsi disk and shared disks else the disks are unusable for the SOFS file cluster. First option is create 3 shared disks

Make sure you using a shared location to store the vhd files.

When using Windows server you can bypass the share location by using a filterdriver fltMC.exe attach svhdxflt I:\ this is not working on windows 11 it is part of the Failover Clustering feature and will only work on Windows Server!

fltmc.exe attach svhdxflt C:\

Attach failed with error: 0x801f0013
The system could not find the filter specified.

To by pass this you can use ISCSI on the VM’s and this can also work perfectly on Azure. As it is a test lab the performance maybe a bit less of the iscsi connection, but works just as good.

So for the shared disk I create 3 iscsi targets each disk is mounted to both VM’s with the build in iscsi initiator. make sure the disks are not formatted and online.

Checking our just created Cluster on ws2022, and make sure it you work on node 1 all the resources are also available on node 1 , not that the disks are sitting on node 2. you could also pause node 2 that way you make sure there are no resources running on that node.

Add disk if you want a normal file server, but we are building a SOFS with CA storage, as I don’t want to wait if the disk is failing over. as a file server is way different that a SOFS!

In this case we want to build a scale out file server so we are not adding the disk here but we going create a disk pool.

A new pool is created , next step is a virtual disk and a volume

When there are no disk available the cluster is not visible here.

a minimum of 3 disks are needed, and in you test lab it can be any size but bigger that 16Gb

creating the pool,

now that the pool is created, we create the disk

The new disk is created in the next step new virtual disk

as we only have 3 disks and two nodes we have limited of configuration options.

I go for a Mirror as this will max my performance, the more disk you have the more performance you will get and different type of disk can also give caching if needed, with modern hardware Gb/s speed is easy done.

I choose here 50Gb but it all depends on the need and disk size you have. I have 1,49TB but i want to create more disk later so i need some space. and I have zero workload here.

When completed we have a virtual disk and just need to create a volume. I did uncheck the box as adding the volume on a different method, same result but just showing you that the cluster is interacting with the file server components.

When created there is a checkbox checked for the blog I unchecked this. Now I have created a Pool With a disk and our last step is creating a volume on that vdisk.

Now that the pool,disk,volume is created we can create the SOFS, must say the SOFS can be created first and add the disk later. but I like to do this this way.

Create the Scale out file server

Make sure you choose Scale out file server, the default is file server.

This will also be your netbios name. Can be changed but better use the correct name. It will be a Distributed network name.

As our final step we add the file share and this share is on top of our CSV volume that we created on the disk pool.

Add a fileshare

Just pick quick

Make sure the disk is also on your connected node, if not then you will not see the cluster storage

Create a share name.

Make sure the checkbox is set on Continuous Availability

Make sure you set the access rights conform your needs.

Make sure you set the permissions right on the file share. and grant the cluster node access to the share.

Then there comes the fun part testing performance

As you can see there is a nice performance on my test lab machine on a 1 core VM.

See good perfromance on just to see how things are working or giving a good demo

Hope it was helpfull thanks for visiting my blog.

Follow Me on Twitter @ClusterMVP

Follow My blog https://robertsmit.wordpress.com

Linkedin Profile Http://nl.linkedin.com/in/robertsmit

How to use Azure proximity placement groups #Azure #SAP #Latency

When moving to Azure or building new infrastructure workloads latency is important and where do I find the numbers of how do I configure it for the best and what is the difference between Azure Availability groups or Azure Availability zones or do I need Azure Site Recovery. Well as a Consultant IT depends.

Availability Sets

Availability Sets takes the virtual machine and configures multiple copies of it.  Each copy is isolated within a separate physical server, compute rack, storage units and network switches within a single datacentre within an Azure Region.

When you create your virtual machine you can specify the Availability Set, you can’t change it or move it in or out of an Availability Set after creation.  If you wanted to make changes you would need to start again and recreate the virtual machine.  Availability Sets only apply to virtual machines, they can’t be used for any other type of resource within Azure. So Local Datacenter redundancy.

Availability Zone

The next level of availability for your virtual machines within Azure is Availability Zones.  With Availability Zones utilized your acceptable downtime a month moves to less than 5 minutes as you’ve got a 99.99% SLA.With Availability Zones you are starting to use zone aware services. Your workload will be spread out across the different zones that make up an Azure region.  An Azure region is made up of multiple datacenters and each zone is made up of one or more datacenters.  Each datacenter is equipped with independent power, cooling and networking.

thumbnail image 1 captioned Availability Zone

You Can imaging when using this there could be some extra latency between the VM’s it all depends on the zone where you are deploying this but that can be tested .

In many Azure regions, the number of datacenters has grown. Azure datacenter latency could be tested here. https://www.azurespeed.com/Azure/Latency

In the next setup I use a Azure VM both in west europe and we test the latency in the same region between vm’s. The tool I use is Latte

On the Server sender we placed the remote receiver IP

Here on the receiver we use the local vm IP and after the test the latency is shown. this is a common setup. If we want to improve this or to make sure that these numbers are not getting worse we need to change the setup.

516 Latency(usec)

When running SAP latency is important, Azure has an option that is called Proximity placement groups. An Azure proximity placement group is a logical construct. When a proximity placement group is defined, it’s bound to an Azure region and an Azure resource group.

A single Azure resource group can have multiple proximity placement groups assigned to it. But a proximity placement group can be assigned to only one Azure resource group.

Proximity placement groups offer co-location in the same data center. However, because proximity placement groups represent an additional deployment constraint, allocation failures can occur (for example, you may not be able to place your Azure Virtual Machines in the same proximity placement group.)

When you ask for the first virtual machine in the proximity placement group, the data center is automatically selected. In some cases, a second request for a different virtual machine SKU may fail since it does not exist in the data center already selected. In this case, an OverconstrainedAllocationRequest error will be returned. To troubleshoot, please check to see which virtual machines are available in the chosen region or zone using the Azure portal or APIs. If all of the desired SKUs are available, try changing the order in which you deploy them.

In the case of elastic deployments, which scale out, having a proximity placement group constraint on your deployment may result in a failure to satisfy the request.

Graphic for proximity placement groups

If you want to use availability zones together with placement groups, you need to make sure that the VMs in the placement group are also all in the same availability zone.

In this sample we gona make an Azure proximity placement group and place Two VM’s in it As an sample I also use a Azure Virtual desktop machine

How to create an Azure proximity placement group, In the azure portal type proxi and the Azure proximity placement group are there.

Select Create , add resource group and pick a name that fits your name convention

Add some tags and that is all or do this in powershell

$resourceGroup = "rg-proxim-demo-weu-01"
$location = "West Europe"
$ppgName = "ppg-avd-sap-01"
New-AzResourceGroup -Name $resourceGroup -Location $location
$ppg = New-AzProximityPlacementGroup `
   -Location $location `
   -Name $ppgName `
   -ResourceGroupName $resourceGroup `
   -ProximityPlacementGroupType Standard

Adding a VM to the new created Azure proximity placement group is selecting the configuration of the VM and add it to the VM. In my case I have an availability set added to my VM. So I must upgrade the entire Availability set to add the Azure proximity placement group

Now that we added the Azure proximity placement group to the VM we need to run the same test again.

Both machines are already in the same availability set that is now added with the Azure proximity placement group

testing from outside the avail from a B2 vm to a D2v3 sku

running this on a d4ds_4 as this is in the av set I need to choose what is in the limit of this set so bound to the VM sku

as you can see it really depends vm sku type what kind of latency you will get but basically it is lower when you are using Azure proximity placement groups

Interesting to see in the PowerShell commands from the Azure proximity placement groups there is also an ultra section, this is currently in preview but can give you even better results but keep in mind you can’t fix it with just one setting check your chain and fix that instead of fixing just one link.

-ProximityPlacementGroupType

Specifies the type of the proximity placement group. Possible values are: Standard or Ultra

$resourceGroup = “rg-proxim-demo-weu-02”
$location = “West Europe”
$ppgName = “ppg-avd-sapultra-02”
New-AzResourceGroup -Name $resourceGroup -Location $location
$ppg = New-AzProximityPlacementGroup -Location $location
-Name $ppgName -ResourceGroupName $resourceGroup
-ProximityPlacementGroupType Ultra

New-AzProximityPlacementGroup: The subscription is not registered for private preview of Ultra Proximity Placement Groups.

Think I need to do some research for this to add my subscription to this preview. Hope it was helpfull thanks for visiting my blog.

Follow Me on Twitter @ClusterMVP

Follow My blog https://robertsmit.wordpress.com

Linkedin Profile Http://nl.linkedin.com/in/robertsmit

Step By Step Troubleshooting Azure Arc-enabled servers with agent connection issues #Windows #WindowsServer #WinServ #Azure #AzureArc #Cloud

Azure Arc-enabled servers enables you to manage your Windows and Linux physical servers and virtual machines hosted outside of Azure, on your corporate network, or other cloud provider. This management experience is designed to be consistent with how you manage native Azure virtual machines. When a hybrid machine is connected to Azure, it becomes a connected machine and is treated as a resource in Azure. Each connected machine has a Resource ID enabling the machine to be included in a resource group. Now you can benefit from standard Azure constructs, such as Azure Policy and applying tags.

When running Azure Arc for some time and suddenly the response stopped you need to dig a bit deeper into the how things are working instead of just kicking off an MSI and the issue is still not fixed.

This is all test So it may look different in your site.just to say so.

Here I have my two servers managed by Arc

Azure Arc-enabled server

As you can see “Something went wrong while getting your resources. Please try again later.”

Azure Arc-enabled server

yes let me get more info about this as currently I know nothing about the error.

image

Azure Arc-enabled server

So It is all OK according to the Azure troubleshooter and still it doesn’t work

Let me click around and see if there is and error ( I could see the local event log of the server but that’s no fun Who uses this ? post some comments in the blog post) Eventlogs are extremely helpful on finding issues or hidden issue’s Often people for get to look at his and see the problem right there. and yes it needs to be fixed also. 

image

Will that be the issue ?  checking already running the latest version, so what is this error or did it go wrong when updating the agent, well I did skip patching for some time on these servers and upgraded these to Windows server 2022

Let me check the agent version,  well the latest version for now..

image

How is this Azure arc be configured anyway, there is no console other than in azure and an MSI with an agent,

let me check the configuration of this and see if I can find something there.

C:\ProgramData\GuestConfig

imageimage

Perfect lots of log files and a config let me check this all

image

time="2021-09-01T16:32:17+02:00" level=error msg="Could not acquire token from cert: FromAssertion(): http call(https://login.windows.net/-d391a79950b1/oauth2/v2.0/token)(POST) error: reply status code was 401:\n{\"error\":\"invalid_client\",\"error_description\":\"AADSTS700027: Client assertion contains an invalid signature. [Reason – The key used is expired., Thumbprint of key used by client: ‘C2FA453DD43C16E584868C1C762DC91EBEC63232’, Found key ‘Start=11/12/2019 15:45:00, End=02/10/2020 15:45:00’, Please visit the Azure Portal, Graph Explorer or directly use MS Graph to see configured keys for app Id ‘a16df9d0-f012-45ae-8a92-1d0ad72e045e’. Review the documentation at https://docs.microsoft.com/en-us/graph/deployments to determine the corresponding service endpoint and https://docs.microsoft.com/en-us/graph/api/application-get?view=graph-rest-1.0&tabs=http to build a query request URL, such as ‘https://graph.microsoft.com/beta/applications/].\\r\\nTrace ID: 932-2ba8-4098-813e-05a2900\\r\\nCorrelation ID: 66a070fe-6ae4-4a25-ad3f-\\r\\nTimestamp: 2021-09-01 14:32:07Z\",\"error_codes\":[700027],\"timestamp\":\"2021-09-01 14:32:07Z\",\"trace_id\":\"932e7194-2ba8-4098-813e-343df05a2900\",\"correlation_id\":\"-4a25-ad3f-160f98c9fd9e\",\"error_uri\":\"https://login.windows.net/error?code=700027\"}"

Seeing the Config and also see the issue here — Client assertion contains an invalid signature. [Reason – The key used is expired–

As I did not update the agent the certificate got expired make sense.

But the device has already the new agent So reconnect ? but how ?

Looking at the Config I see all the details how the agent is been registered and the resource group etc

C:\ProgramData\AzureConnectedMachineAgent\Config

agentconfig.json

{"subscriptionId":"f34","resourceGroup":"AzureBackupRG_westeurope_1","resourceName":"Hyperv1201","tenantId":"0b1","location":"westus2","vmId":"9659193c-f4d8-4a77-b8f9baad507ce9a9","certificateThumbprint":"c2fa453dd43c16e584868c1c762dc91ebec63232","clientId":"0-f012-45ae-8a92-1045e"}

Let me open powershell and maybe I got more details. and reactivate the Agent

With the azcmagent command you can get more details.

image

let me get all the logs

azcmagent logs

image

now we have all the logs in a zip file this could be handy for a next time.

Azure Arc-enabled server

As I reconfigure the agent with the following command

& "$env:ProgramFiles\AzureConnectedMachineAgent\azcmagent.exe" connect –resource-group "AzureBackupRG_westeurope_1" –tenant-id "your tenant id" –location "westus2" –subscription-id "errryh934" –verbose

With the reconnect we need to log in again and all goes well

imageimage

But in the logging there is suddenly another error

image

When looking here I see there is an Azure Policy that demands a TAG and this is currently not available on the resource group So I Can’t onboard my Azure Arc server.

Thought this was about an Agent that has an expired Certificate.

Azure Arc-enabled server

Seems there is a Azure policy that is blocking as the hyperv1201 has no tags set the mvpdc02 has only a tag set.

image

image

image

After a quick change I rerun the command line and it worked perfectly and it showed up in the console again.

& "$env:ProgramFiles\AzureConnectedMachineAgent\azcmagent.exe" connect –resource-group "MVPRSG-Azure-Arc" –tenant-id "3078684f-d143-440a-ae40-d391a79950b1" –location "West US 2" –subscription-id "df1e2f32-7adf-48f6-b969-f02376152934" –verbose

image

Starting client connection on: \\\\.\\pipe\\himds"
time="2021-09-01T17:12:53+02:00" level=debug msg="Awaiting status message from agent…"
time="2021-09-01T17:12:53+02:00" level=debug msg="Status Message received"

image

As I have a second machine with the same issue I removed the machine directly in the arc portal and rerun the registration as the agent was also already installed. (this would be the quick fix for this)

Azure Arc-enabled server

Perfect reconnecting and waiting for the Agent.

Azure Arc-enabled server

Now I can look at the Azure Arc Insights again.

Flickr Tags: Windows Server 2022,CloudOS

Follow Me on Twitter @ClusterMVP

Follow My blog https://robertsmit.wordpress.com

Linkedin Profile Http://nl.linkedin.com/in/robertsmit


First hands-on Upgrading to Windows Server 2022 Domain Controller #Windows2022 #Windows2016 #winserv #CloudOS #WIMVP

Windows Server 2022 is built on the strong foundation of Windows Server 2019 and brings many innovations on three key themes: security, Azure hybrid integration and management, and application platform. Also, Windows Server 2022 Datacenter: Azure Edition helps you use the benefits of cloud to keep your VMs up to date while minimizing downtime.

https://docs.microsoft.com/en-us/windows-server/get-started/whats-new-in-windows-server-2022?WT.mc_id=AZ-MVP-4025011

As some of my Domain controllers are running on Server 2016 this is a great moment to upgrade them,Upgrading a domain controller is always tricky when you loos you AD, well I got a copy in Azure Winking smile

How ever Windows Server 2016 is supporting Rolling Upgrades Upgrading to Windows Server 2022 but this is only for a Cluster.

For other Servers you can upgrade your server or better reinstall. Bet you all choose for the Clean install. Well For a domain controller, it’s a quick process to redeploy but often there is ton’s of software on the DC that should not be there and makes it hard to loos the DC right ?

So my DC server 2016

image

Finding the FSMO roles

netdom query fsmo

image

You can’t upgrade the server when there is a FSMO role running on the server. Tested this and if failed So move the FSMO roles from your DC.

Yes I hear you you have only one DC well create a virtual second one and move the fsmo roles to that server upgrade and move the roles back and demote the Extra DC and you are back to a single DC.

my other DC is mvpdc22

image

I move the roles to my second DC

image

Quick and Smooth migration

Move-ADDirectoryServerOperationMasterRole -Identity “Your-DC” -OperationMasterRole SchemaMaster,RIDMaster,InfrastructureMaster,DomainNamingMaster,PDCEmulator

I mounted the ISO to the DC (virtual CD disk)

image

YEs I want to make the product better.

image

Use your Product key or if you are on hyber-v you can use the AVMA key https://docs.microsoft.com/en-us/windows-server/get-started-19/vm-activation-19?WT.mc_id=AZ-MVP-4025011

The following AVMA keys can be used for Windows Server 2022:

Datacenter
W3GNR-8DDXR-2TFRP-H8P33-DV9BG

Standard
YDFWN-MJ9JR-3DYRK-FXXRW-78VHK

image

I still love my gui So I install the desktop experience

image

Read the entire EULA and I agree.

image

My domain Controller desktop (remember this is my lab) Don’t use your DC for any other things than using it for a DC.

I want to keep My files

image

Yes Install

image

Let the Setup running

imageimage

So in just 20 min my DC was upgraded to 2022 lot’s of new stuff is there but that’s all for a next blog post. Hope it was usefull and remember make sure you have a backup things my fail in your environment

https://docs.microsoft.com/en-us/windows-server/get-started/whats-new-in-windows-server-2022?WT.mc_id=AZ-MVP-4025011

Flickr Tags: Windows Server 2016,CloudOS

Follow Me on Twitter @ClusterMVP

Follow My blog https://robertsmit.wordpress.com

Linkedin Profile Http://nl.linkedin.com/in/robertsmit


How to change Azure Public IP SKU upgrade Basic to Standard #Azure #IP #SKU #Blog

Azure public IP addresses now support the ability to be upgraded from Basic to Standard SKU.  Additionally, any Basic Public Load Balancer can now be upgraded to a Standard Public Load Balancer, while retaining the same public IP address.  So what could be the reason to change the SKU.

First the Difference and the price between Standard and basic

Standard

Standard SKU public IP addresses:

  • Always use static allocation method.
  • Have an adjustable inbound originated flow idle timeout of 4-30 minutes, with a default of 4 minutes, and fixed outbound originated flow idle timeout of 4 minutes.
  • Secure by default and closed to inbound traffic. Allow list inbound traffic with a network security group.
  • Assigned to network interfaces, standard public load balancers, or Application Gateways. For more information about Standard load balancer, see Azure Standard Load Balancer.
  • Can be zone-redundant (advertized from all 3 zones) or zonal (can be created zonal and guaranteed in a specific availability zone). To learn more about availability zones, see Availability zones overview and Standard Load Balancer and Availability Zones. Zone redundant IPs can only be created in regions where 3 availability zones are live. IPs created before zones are live will not be zone redundant.
  • Can be used as anycast frontend IPs for cross-region load balancers (preview functionality).

Cost of single IP Sample

How to change Azure Public IP SKU upgrade Basic to Standard #Azure #IP #SKU #Blog

Basic

All public IP addresses created before the introduction of SKUs are Basic SKU public IP addresses.

With the introduction of SKUs, specify which SKU you would like the public IP address to be.

Basic SKU addresses:

  • Assigned with the static or dynamic allocation method.
  • Have an adjustable inbound originated flow idle timeout of 4-30 minutes, with a default of 4 minutes, and fixed outbound originated flow idle timeout of 4 minutes.
  • Are open by default. Network security groups are recommended but optional for restricting inbound or outbound traffic.
  • Assigned to any Azure resource that can be assigned a public IP address, such as:
    • Network interfaces
    • VPN Gateways
    • Application Gateways
    • Public load balancers
  • Don’t support Availability Zone scenarios. Use Standard SKU public IP for Availability Zone scenarios. To learn more about availability zones, see Availability zones overview and Standard Load Balancer and Availability Zones.

Cost of single IP Sample

How to change Azure Public IP SKU upgrade Basic to Standard #Azure #IP #SKU #Blog

With this Standard seems to have more and better options but is 1 euro more expensive So you could think Always use standard But A public IP address is assigned to the VPN Gateway to enable communication with the remote network. You can only assign a dynamic basic public IP address to a VPN gateway.

So it really depends on what you want to use, suppose you start with basic and need standard you can change this now with PowerShell or cli but not in the GUI

Limitations

  • In order to upgrade a Basic Public IP, it cannot be associated with any Azure resource. Please review this page for more information on how to disassociate public IPs. Similarly, in order to migrate a Reserved IP, it cannot be associated with any Cloud Service. Please review this page for more information on how to disassociate reserved IPs.
  • Public IPs upgraded from Basic to Standard SKU will continue to have no availability zones and therefore cannot be associated with an Azure resource that is either zone-redundant or zonal. Note this only applies to regions that offer availability zones.
  • You cannot downgrade from Standard to Basic.

How to change Azure Public IP SKU upgrade Basic to Standard #Azure #IP #SKU #Blog

In my fresh created IP called demo We change this to a standard IP address

Using the portal to run some powershell commands.

## Variables for the command ##
$rg =”rg-demo-weu-01”
$name = “demo”
$newsku = ‘Standard’
$pubIP = Get-AzPublicIpAddress -name $name -ResourceGroupName $rg

basic resource group and IP address name

How to change Azure Public IP SKU upgrade Basic to Standard #Azure #IP #SKU #Blog


## This section is only needed if the Basic IP is not already set to Static ##
$pubIP.PublicIpAllocationMethod = ‘Static’
Set-AzPublicIpAddress -PublicIpAddress $pubIP

image


## This section is for conversion to Standard ##
$pubIP.Sku.Name = $newsku
Set-AzPublicIpAddress -PublicIpAddress $pubIP


How to change Azure Public IP SKU upgrade Basic to Standard #Azure #IP #SKU #Blog

Fixed IP address SKU changed from Basic to Standard.  Remember there is no option to undo this.


Now testing with an used IP and connected to an VM. ( this VM is currently deallocated) as these changes can only be done offline.

How to change Azure Public IP SKU upgrade Basic to Standard #Azure #IP #SKU #Blog

With this the resource changed from basic to Standard.

How to change Azure Public IP SKU upgrade Basic to Standard #Azure #IP #SKU #Blog


Try to undo this then the following message is there

Set-AzPublicIpAddress -PublicIpAddress $pubIP

Set-AzPublicIpAddress: Sku property is set at creation time and cannot be changed from Standard to Basic on resource update for resource


Changing the SKU is a nice option, that way you can keep the IP and lift the needed options with zero downtime.


Follow Me on Twitter @ClusterMVP

Follow My blog https://robertsmit.wordpress.com

Linkedin Profile Robert Smit MVP Linkedin profile

Google  : Robert Smit MVP profile

Azure Migration Services – Easy Cloud Migration Services #Azure #Cloud #ASR #Migrate #azops #VMware #Database

This blog post is a bit long sorry for this tons of screen shots to give you more detail. This is all based on Hyper-v but the same steps are there for Vmware! I could have create two blog post one based on the Assessment and one on the Replication. but now you have all the details together.

Azure Migrate is there for sometime this tool makes your life easier when you want to migrate to Azure. This can migrate Vmware or Hyper-v to Azure. The process is similar as the Azure Site Recovery Process but this is only for Disaster. In the old days it is used also for migration but the Azure Migrate is much more flexible. placing VM’s on the existing network or on a different one.  New functions are released every month . https://docs.microsoft.com/en-us/azure/migrate/whats-new

For this Blog I used a Hyper-v Server and some VM’s that are migrated to an existing network in Azure. I also used 2 methods one with the Azure Migrate: Server Assessment and Azure Migrate: Server Migration  the big difference is with the Azure Migrate: Server Migration there is just a cut over no upfront assessment it creates a replica and place this in Azure.

In most of the initial migrations Customers want lift and shift. This is a method if you want to move quickly to Azure. better is to do a Server Assessment before the migration or rebuild the server on a new OS if needed.

Step 1 is in the Azure portal type Azure Migrate and check the assess and migrate.

image

I create a new Project for this and create a new resource group. and I choose also the geo location.

image

Based on hyper-V we download the Exported VM from the Azure portal and import this VM into the Hyper-v server.

image

select the right platform. The migration process for VMware is similar than the Hyper-V VM once the VM is connected to the portal.

imageimage

We select the Hyper-v VM   in the preparation we choose to download the 9GB Migration Appliance.

image

image

When doing this on a Migration Server directly you get a warning that IE is not supported anymore.  I used Edge chromium instead. As the connections with IE failed, So a better Browser is needed.  Get Edge https://www.microsoft.com/en-us/edge?form=MA13DE&OCID=MA13DE

Importing the VM with the Hyper-v Wizard is an easy and quick step use the Hyper-v manager to import the VM

image

Then start the VM and the EULA is displaying and it is also the start of the migration Wizard.

image

Remember to use a different browser than IE. Currently IE is in the Migration server.  Get Edge https://www.microsoft.com/en-us/edge?form=MA13DE&OCID=MA13DE

image

We start the Migration Configuration Wizard – Remember not use IE

image

image

With the basic configuration steps we start connecting the Migration server to the Hyper-v server.

image

In this connection wizard we select the just created Migration project in the Azure portal. ( if you have multiple the select the right one as this is been connected to this hyper-v server)

image

If you have trouble to register the server Check your DNS / user account / Browser / WMI ( in a standalone site could this be an issue)

image

These credentials will connect to my Server. not the VM’s

image

You can use FQDN or the IP to connect to the Hyper-V server.

image

I changed the DNS to get some common errors.

image

Setting the DNS correctly These are common errors and often seen in standalone configurations.

image

This can take some time as mentioned below.

image

After the registration we can follow the steps in the Azure Portal.

image

We let this run for some time and come back later… and we move to the Database migration.

We do a different step. As the migrate tool is not showing you all the pieces

Setting up the Database Migrate. is in the same steps. but in the Azure migration blade some screens are only found in the resource groups.

Setup the Database migration project.

image

In this I choose the Preview option things may change when it is GA. But lets see how it works.

image

When this is done, I noticed that the download is not always starting https://www.microsoft.com/en-us/download/details.aspx?id=53595

image

image

When the project is created you can see the Database overview but see the real config you need to go to the resource group.

image

The fun part here is I created first the screenshots and add later the text but doing this I had a hard time on finding the configured items as not all components are in the migration blade. So back to the resource group there I find the hints.

image

The Azure Database Migration Service can be opened from the resource group as shown above.

The Discovery

When the discovery is done, then we can start with the fun part.

image

Here my 33 VM’s are scanned and all without an Agent.

image

Now that the Hyper-v Host is completely scanned we can start with the assessment of the VM’s

image

First we create some profiles on region and size that the VM’s will get.

image

This can be changed if needed

image

We create some Scan profiles and target location, I used the Dv4 machine types with no temp disks.

image

These machines are indexed and now I pick 2 for an assessment. and place them into a group

image

When this is ready we can see the scan results. estimated price details and the VM SKU choice

image

For best result you can install an agent to get more in-depth information

image

When the machine is not connected to an OMS workspace (Azure log analytics ) not all the info can be displayed as the service dependency’s

image

Add the VM to a new Workspace or to an Excising one Configure the right steps. I add a new Workspace for the Migration as this data can be removed after the migration SO I don’t want it in my current workspace.

image

Once the Agent is reporting to the workspace and you run a new assessment a Service map can be displayed.

imageimage

Nice dashboard on the Cost and migration status, after this it is easy to migrate to Azure or you may need to do some extra work to migrate this server to Azure.

Azure Replication Migration

When Looking in the portal We can also create a Different Migration direct replication the lift and shift method. This uses the ASR tooling but with a difference here you can choose on what network the VM must land.

image

Installing the ASR agent on the Hyper-v Server.

image

image

Don’t forget to Finalize your registration ! this can be done after the Agent installation

image

Installing the ASR agent

imageimageimageimage

Now that the Agent is installed we need to register this to Azure. Make sure You have downloaded the Credential file

image

Load the Cred file into the Agent and finishes the installation

imageimage

Now we can start the Replication of the VM’s

image

important here to finish de registration I was forgotten this so the replication did not work.

image

imageimage

I choose a demo VM that Can be migrated to Azure.

The Migration

imageimage

Pick hyper-v or Vmware depending what you using.

imageimage

I pick a VM

image

Selecting the resource group and Network where the VM lands. This is great now you can place the VM direct in the right spot.

imageimage

My VM name is “windows” we these names are not allowed in Azure and are protected names. therefor I need to rename the VM

imageimage

The replication is started and we do a Test migration.

imageimageimageimage

image

There are no issues SO we start the test migration from the Azure blade.

image

image

imageimage

Now that the failover is successful we do the cutover and run the VM in Azure. Similar as in ASR but there is no replication back.

image

In the Azure portal we can see the machine is running, login into the machine and check everything runs smoothly.

image

The VM is migrated Lift and shift. and placed on a selected network.

image

The replication is set to normalimage

image

Now that the VM is migrated and running we can remove this from the Hyper-v server. as the machine is not deleted on-premises.

Download this e-book to learn about Azure Migrate, Microsoft’s central hub of tools for cloud migration. In this e-book, we’ll cover:

  • What is Azure Migrate
  • How Azure Migrate can help your migration journey
  • Running a datacenter discovery and assessment
  • Migrating your infrastructure, applications, and data
  • Additional learning resources

Download

Follow Me on Twitter @ClusterMVP

Follow My blog https://robertsmit.wordpress.com

Linkedin Profile Robert Smit MVP Linkedin profile

Google  : Robert Smit MVP profile

Starting with FIDO2 security keys With Azure Active Directory #Trustkey #pointblank #fido #Azure #Security #AAD

Received a great FIDO2 Test kit from the vendor PointBlank Security / TrustKey Solutions https://www.trustkeysolutions.com/  https://www.pointblank.de/en/

As FIDO2 is the new hot item in the security world, let see if it is that easy to implement and to use. I’m not going into the depth specs of the keys but more as a user view. easy to use and setup is this key to use by anyone.

for all the Azure AD login this is usable when the Microsoft authentication challenge is the say for Windows virtual desktop (WVD) you can use this.

https://www.pointblank.de/en/ https://www.trustkeysolutions.com

I have a USB key and a USB-C type key.

FIDO2image

I use my Computer with the normal USB for this so the Trustkey G310 model

FIDO2

Setting the Key en use it is simple I configured the Azure Active directory did some easy settings add the Key to my profile and ready.

First we Enable FIDO2 security key in the Azure AD this is been configured from the Azure Portal.

Azure Active directory <> Security

FIDO2 

Next we go to authentication methods.

image

Here we can change the authentication type for all users of for a select of users.

image

When this is done you can set the fido option in your profile. If this is your own account then in the top of the azure portal you can go directly to your user account . or go to https://myaccount.microsoft.com/

 image

Go to Security info

image

Here you can do add a method

image

Adding the Security key or if you want to used the phone the method is similar.

imageimage

Now that we have chosen the FIDO2 Security Key we can configure this with a PIN.

imageimageimage

Choose a proper Pin and use the Key. Now everything is set and ready to use.

Whenever you are challenged to login with the Microsoft Azure AD account you can make the choice on using the USB key. You can also make this dedicated

So for samples we go to  Browse to https://myprofile.microsoft.com use an in private session or different browser to make sure you test this right.

image

image

select sign in with a security key

FIDO2image

When entering the PIN and touching the USB you will be granted to login when it was successful you will see the page else it will prompt you again.

image 

All this is perfect usable to login into your WVD portal

https://rdweb.wvd.microsoft.com/webclient/index.html

image FIDO2


Follow Me on Twitter @ClusterMVP

Follow My blog https://robertsmit.wordpress.com

Linkedin Profile Robert Smit MVP Linkedin profile

Google  : Robert Smit MVP profile

Proud and honored to announce that, I have been reawarded (12th time) as Microsoft Most Valuable Professional (MVP) in the Microsoft Azure Category #MVPBuzz #Azure #Microsoft

As Yesterday was the renewal day 1st of July and waiting for THE email and waiting and the MVP website was slow and down all the MVP’s are checking the status. As I did not see any email till 18:00 thought well I need to go and do some stuff Lets see this tomorrow.

and there it is at 18:10 the email with the proof. Got my 12th MVP Award.

I Would thank the Community as I could not do this without you, this get me the inspiration on the blog Items and during the events with the AMA sessions.

image

For me, being awarded as a Microsoft MVP is a great honor. This award is a marvelous acknowledgment for all my activities.

I started as a MVP for “Clustering” in 2009 which then a small team of 4 MVP’s  It was a very exiting time to be part of that group among great personalities! Today, I’m doing mostly projects around Microsoft Azure and Windows Modern Workplace, so I’m really proud and happy that my community contributions ended up in a renewal for Azure.


Congrats to all new and renewed MVP colleagues!  #MVPBuzz @MVPAward


Follow Me on Twitter @ClusterMVP

Follow My blog https://robertsmit.wordpress.com

Linkedin Profile Robert Smit MVP Linkedin profile

Google  : Robert Smit MVP profile

Step by Step Azure NAT Gateway – Static Outbound Public IP address #ANG #NAT #WVD #Azure #Security #Cloud #MVPBuzz #AzOps #ITPRO #VirtualNetworks #PowerShell

There a several ways on using an external IP in Azure, What method to use is up to you. Remember there is no good or wrong but only different opinions or insights on how to use it.

Public IP addresses allow Internet resources to communicate inbound to Azure resources. Public IP addresses also enable Azure resources to communicate outbound to Internet and public-facing Azure services with an IP address assigned to the resource. The address is dedicated to the resource, until it is unassigned by you. If a public IP address is not assigned to a resource, the resource can still communicate outbound to the Internet, but Azure dynamically assigns an available IP address that is not dedicated to the resource.

Some of the resources you can associate a public IP address resource with are:

  • Virtual machine network interfaces
  • Internet-facing load balancers
  • VPN gateways
  • Application gateways
  • Azure Firewall
  • NAT Gateway

Matching SKUs must be used for load balancer and public IP resources. You can’t have a mixture of basic SKU resources and standard SKU resources. You can’t attach standalone virtual machines, virtual machines in an availability set resource, or a virtual machine scale set resources to both SKUs simultaneously.

Virtual Network NAT (network address translation) simplifies outbound-only Internet connectivity for virtual networks. When configured on a subnet, all outbound connectivity uses your specified static public IP addresses. Outbound connectivity is possible without load balancer or public IP addresses directly attached to virtual machines. NAT is fully managed and highly resilient.

image

So this is only for the Outbound connection. why not use the Resource group IP this is also “static” ? using this IP means that al VM’s must be in the same resource group and when the resource group changed the IP is also changing.

image

NAT is compatible with standard SKU public IP address resources or public IP prefix resources or a combination of both. You can use a public IP prefix directly or distribute the public IP addresses of the prefix across multiple NAT gateway resources. NAT will groom all traffic to the range of IP addresses of the prefix. Any IP whitelisting of your deployments is now easy.

So How to implement this. a step by step guide. GUI and powershell Looking at my demo setup, There are 2 vm’s both in a different Resource group.

Setting up the NAT gateway is done by 3 tabs to fill in the name and what vnet to use

https://robertsmit.wordpress.com/

We add a new NAT gateway.

image

We create a new resource group and choose NAT gateway name.

The Timeout we leave this on 4 min for now.

image

We configure an external IP and with a standard SKU. Basic is not supported.

image

the next step is choose the External outbound IP pool minimal is 2 and max is 256. this is not needed but only if you want to have a pool of External IP’s else it just go the one external ip

image

you can select max 2 prefixes

image

Configure which subnets of a virtual network should use this NAT gateway. Subnets with Basic load balancers or virtual machines that are using a Basic public IP are not compatible and cannot be used.
Note: While you do not have to complete this step to create a NAT gateway, the NAT gateway will not be functional until you have added at least one subnet. You can also add and reconfigure which subnets are included after creating the NAT gateway.

image

in the last step we tag the NAT gateway to a subnet. When checking the VM’s on this subnet for the outbound IP ( remember the VM does not need a public IP on the network card)

image

Here I have 2 VM’s getting both an IP from the prefix

imageimage

If there is only a small prefix then both machines will get the same external outbound IP

imageimage

With this time flow it recycles the External IP, depending on the scope and usage.

image

So in just a few steps you can use a useful gateway for all your outbound traffic.

Building this in Powershell is also easy. I use a semi automatic script as I want to choose my network. but you can change this to a fixed network if you want.

remember this will need the az.network latest module. in the old modules there is no get-AzNatGateway command. without this the posh is not working.

First we have some parameters

# Set the variables for the NAT Gateway.
$rg = ‘rg-rsm-natgw001’
$Location = ‘Westeurope’
$sku = ‘Standard’
$PublicIpname = ‘pup-rsm-natgw001’
$Publicprefixname = ‘pxp-rsm-natgw001’
$NatGatewayname=’gwn-rsm-natgateway001′

#create Rsource group
New-AzResourceGroup -Name $rg -Location $Location 

image

First we make some external IP and or a range.

#create Standard SKUP public IP
$publicIP = New-AzPublicIpAddress -Name $PublicIpname -ResourceGroupName $rg -AllocationMethod Static -Location $Location -Sku $sku
$publicIP | Select-Object Name, ResourceGroupName, IpAddress, IdleTimeoutInMinutes, ProvisioningState

https://robertsmit.wordpress.com

With the Zone attribute you can create zone redundancy, but this is not needed for this resource.

#create  IP prefix ( how many IP’s are needed)
$publicIPPrefix = New-AzPublicIpPrefix -Name $Publicprefixname -ResourceGroupName $rg -Location $Location -PrefixLength 29

$publicIPPrefix | Select-Object Name, IPPrefix, PrefixLength, ProvisioningState

image

You can skip this if you want only one external IP.

Next is creating the gateway.


#Create NAT gateway
$natGateway = New-AzNatGateway -Name $NatGatewayname -ResourceGroupName $rg -PublicIpAddress $publicIP -PublicIpPrefix $publicIPPrefix -Location $Location -Sku $sku -IdleTimeoutInMinutes 4
$natGateway  | Select-Object Name, ResourceGroupName, IdleTimeoutInMinutes , SKuText | Format-table -autosize –wrap

image

Now that the Gateway is created we can add a subnet to this. I used a point an click so that I can choose the network and subnet. but you can also use a variable to do this.

$virtualNetwork = Get-AzVirtualNetwork | Out-GridView -PassThru -Title "Pick the vnet that will be used for the NAT gateway"

https://robertsmit.wordpress.com

$NATSubnet = Get-AzVirtualNetworkSubnetConfig -VirtualNetwork $virtualNetwork | Out-GridView -PassThru -Title "Pick the Subnet that will be used for the NAT gateway"

image

$NATSubnet.NatGateway = $natGateway
$virtualNetwork | Set-AzVirtualNetwork

The network is chosen and the subnet is selected.

In the Azure portal you can see the result.

https://robertsmit.wordpress.com


Follow Me on Twitter @ClusterMVP

Follow My blog https://robertsmit.wordpress.com

Linkedin Profile Robert Smit MVP Linkedin profile

Google  : Robert Smit MVP profile


Update all AZ. Azure Powershell Modules #PowerShell #Azure #Script #modules

If you do a lot with Azure and PowerShell you may noticed that the latest module is important. as functions may not be there or properties are not listed correctly.

There are plenty of scripts around on how to update these modules. 

With the  Get-InstalledModule you will get a list of the modules on your system

image

When doing get module with the –listAvailable you will see all the versions

Get-Module -Name az.* -ListAvailable

image

here is the powershell code Like I said before there are tons of the same scripts around on github or blog post. So don’t invent the wheel again reuse and modify to your needs

Get-Module -Name az.* -ListAvailable |
  Where-Object -Property Name -ne ‘Az.’ |
  ForEach-Object {
    $currentVersion = [Version] $_.Version
    $newVersion = [Version] (Find-Module -Name $_.Name).Version
    if ($newVersion -gt $currentVersion) {
      Write-Host -Object "Updating $_ Module from $currentVersion to $newVersion"
      Update-Module -Name $_.Name -RequiredVersion $newVersion -Force
      Uninstall-Module -Name $_.Name -RequiredVersion $currentVersion -Force
    }
  }

Running this can tike some time as you can see In this case I have a lot of old and new modules and these are being updated to the latest versions

image

When updating this I had some PowerShell windows still open and got some errors, you can also do this by hand.

For sample  – Install-Module -Name Az.Accounts -RequiredVersion 1.8.0 –Force

image

Hope this helps you to a better Azure PowerShell experience. 


Follow Me on Twitter @ClusterMVP

Follow My blog https://robertsmit.wordpress.com

Linkedin Profile Robert Smit MVP Linkedin profile

Google  : Robert Smit MVP profile

Starting With Azure Tags: What do my resources Costs .#Azure #Cost #Tags #Cloud #Governance #WiMVP #Mvpbuzz

When starting With Azure The Costs are important. If you have created a lot of resources you might want to know who owns the resources or what is the purpose of this resource.

Resource management: Your IT teams will need to quickly locate resources associated with specific workloads, environments, ownership groups, or other important information. Organizing resources is critical to assigning organizational roles and access permissions for resource management.

Azure Tags: What do my resources Costs. #Azure #Cost #Tags #Cloud #governance

Tagging resources  is the way to find the resource and keep it with the purpose that you used it for. but over time things may change or added.

There are tons of reasons why you should use Tagging

  • Cost management and optimization
  • Cloud accounting models
  • ROI calculations
  • Cost tracking
  • Budgets
  • Alerts
  • Recurring spend tracking and reporting
  • Post-implementation optimizations
  • Cost-optimization tactics
  • Operations management
  • Security
  • Governance and regulatory compliance
  • Automation
  • Workload optimization

Azure Tags: What do my resources Costs. #Azure #Cost #Tags #Cloud #governance

That way items in your resource groups may be un tagged. You can set policys for this but when there is some wild resource you might wan to check it first be for tagging.

Azure Tags: What do my resources Costs. #Azure #Cost #Tags #Cloud #governance

As you can see the TAG’s are not applied to all the resources.

Azure Tags: What do my resources Costs. #Azure #Cost #Tags #Cloud #governance

When you check the cost on the tag or on the resource group you will see different numbers. For adding the tag to all resources in the Resource group We use a PowerShell line.

First we connect to the Azure subscription or use the CLI

Connect-AzAccount
Login-AzAccount
Get-AzSubscription
Select-AzSubscription -Subscription "Microsoft Azure”

We select the resource group.

$RG = "rsmvprsg01"

When we check that resource group it has a tag. So there is no need to set an tag unless you want to set an extra tag to the resources.

image

Now We are setting the tag to all the resources that are in the resource group. Get-azresourcegroup and set the TAG.

$group = Get-AzResourceGroup -Name $rg
Get-AzResource -ResourceGroupName $group.ResourceGroupName | ForEach-Object {Set-AzResource -ResourceId $_.ResourceId -Tag $group.Tags -Force }


Azure Tags: What do my resources Costs. #Azure #Cost #Tags #Cloud #governance

When looking in the Billing you might not see this directly

image

Drilling down on the resource you can see it is set.

image

If you did not had set the Tags then you need to define a tag first.

#Force Tags to all resources
#set tag no pre defined
Set-AzResourceGroup -Name $rg -Tag @{ env="Robert Smit"; RSM="ClusterMVP" }

Azure Tags: What do my resources Costs. #Azure #Cost #Tags #Cloud #governance

  • Define what each tag should be used to identify.  Tag name : The exact term used for the tag, e.g. “Application” , “Department” , “Project”
    Values:  List all potential values for each tag name, e.g. “finance”, “website” , “name”
  • Tag names can have up to 512 characters, values can have up to 256
  • These characters aren’t supported with tags: < > % & / ?

$group = Get-AzResourceGroup -Name $rg
Get-AzResource -ResourceGroupName $group.ResourceGroupName | ForEach-Object {Set-AzResource -ResourceId $_.ResourceId -Tag $group.Tags -Force }

Azure Tags: What do my resources Costs. #Azure #Cost #Tags #Cloud #governance

And you can do this also with the Azure CLI

Open the CLI in the Azure portal

image

I’ll use the same settings

env="Robert Smit"; RSM="ClusterMVP"


az tag create –name Env

az tag add-value –name Env –value "Robert Smit”


Azure Tags: What do my resources Costs. #Azure #Cost #Tags #Cloud #governance


Now that the Tags are created we can add them to a resource group


az group update -n rsmdemo01–set tags.Env="Robert Smit" tags.MVP=ClusterMVP


image

Is sett two tags but you can set just one or multiple.

Enforce tagging rules with Azure policies can done easily as there are many examples here https://docs.microsoft.com/en-us/azure/azure-resource-manager/management/tag-policies

Assign policies for tag compliance

The Link will take you to the Github repository https://github.com/Azure/azure-policy 

image


Follow Me on Twitter @ClusterMVP

Follow My blog https://robertsmit.wordpress.com

Linkedin Profile Robert Smit MVP Linkedin profile

Google  : Robert Smit MVP profile

Step By Step Azure Files share SMB with native AD support and more #Microsoft #AzureFiles #SMB #SnapshotManagement #Azure #Cloud #MVPBuzz #WiMVP

For some time I see all kinds of options to use Azure files, have some great ideas and thoughts. Connecting this over the vpn of use the azure files with a dfs. Useful maybe ? fun absolutely building things just a way that is maybe a bit different is fun and you may see other opportunities on how to use the resources. 

Using Azure Files is not new, But using Azure files with Active directory Authentication is a long waited feature and now that it is GA we can use this.

Azure Files is a shared storage service that lets you access files via the Server Message Block (SMB) protocol, and mount file shares on Windows, Linux or Mac machines in the Azure cloud.
Azure Files supports identity-based authentication over Server Message Block (SMB) through two types of Domain Services: Azure Active Directory Domain Services (Azure AD DS) (GA) and Active Directory (AD).
Azure file shares only support authentication against one domain service, either Azure Active Directory Domain Service (Azure AD DS) or Active Directory (AD).

image

AD identities used for Azure file share authentication must be synced to Azure AD. Password hash synchronization is optional.
AD authentication does not support authentication against Computer accounts created in AD.

So what would be the option to use this, As a Cloud file share, in WVD or RDS, you can connect this directly to your clients if needed.

image

image

AD authentication can only be supported against one AD forest where the storage account is registered to. You can only access Azure file shares with the AD credentials from a single AD forest by default. If you need to access your Azure file share from a different forest
Azure Files supports Kerberos authentication with AD with RC4-HMAC encryption. AES Kerberos encryption is not yet supported.


So how to start with Azure Files. In this blog post I created a Powershell script that does the most of the Config to get you started with Azure Files.

First we need to address some parameters

#ResourceGroup name and location
$RG="rsg-blog-fileshare20"
$Location="eastus2"  
$storageaccount="storfileserver20"
$shareName = "blogshare01"

These basis are needed to create the Azure resources but there is also a Special PowerShell module needed AzFilesHybrid Download and unzip the AzFilesHybrid PowerShell module

This module can be download from github and extracted on your machine

image

You may need to set the executionPolicy

#Azure file modules
#Set-ExecutionPolicy -ExecutionPolicy Unrestricted -Scope Currentuser
cd c:\AzFilesHybrid
Unblock-File .\CopyToPSPath.ps1
.\CopyToPSPath.ps1

The CopyToPSPath.ps1 will load the modules that are needed for this.

Our next step is importing the module AzFilesHybrid

Import-Module -name AzFilesHybrid -Force

image

Our next step is connect to our Azure subscription

#Connect to Azure
Connect-AzAccount

#Select the target subscription for the current session use your subscription ID
Get-AzSubscription
Select-AzSubscription –SubscriptionId  11111111-1111111111-111111111-11111-1

image

Now that the Azure subscription is connected we make a resource group and the storage account with the share.
#create Rsource group
New-AzResourceGroup -Name $RG -Location $Location

image

#create storage account
New-AzStorageAccount -ResourceGroupName $RG -Location $Location -Name $storageaccount -SkuName Standard_LRS -AccessTier Hot

image

#create storage Fileshare
New-AzRmStorageShare -ResourceGroupName $RG -StorageAccountName $storageaccount -Name $shareName -QuotaGiB 1024  #| Out-Null

image

Now that the storage account is created and the share we make a computer account for the AD rights, optional is the OU location where the computer account is stored.

Important action het is that this should run on a domain joined computer, as it needs to have access to the domain to create the computer account. Needless to say but you need a proper AD account to create the Computer account.

#join azure files to AD
Join-AzStorageAccount -ResourceGroupName $RG -Name $storageaccount -DomainAccountType "ComputerAccount" -OrganizationalUnitName "File Servers"

image

Now that the computer account is created we can move to the next steps, As I want to add a privatepoint and make sure my local DNS can find the fileshare.

image

So how does this look like in the Azure portal.

image

Here is the fileshare and file server with all the configuration options

image

The share is AD ready. The Option is enabled and ready to use

Now that we have the share in place we can configure the share. First we test the Connection from the Server to the Azure file share.

#test SMB connection
Test-NetConnection -ComputerName storfileserver20.file.core.windows.net -CommonTCPPort SMB

image

The file share can be used, but wait there is more, it al depends on your configuration. If you use the share only in Azure then DNS forwarders are not need, but just in case.

This works but we will create an endpoint now to make sure the share is not listening to all requests

image

You can use private endpoints for your Azure Storage accounts to allow clients on a virtual network (VNet) to securely access data over a Private Link. The private endpoint uses an IP address from the VNet address space for your storage account service. Network traffic between the clients on the VNet and the storage account traverses over the VNet and a private link on the Microsoft backbone network, eliminating exposure from the public internet.

Using private endpoints for your storage account enables you to:

  • Secure your storage account by configuring the storage firewall to block all connections on the public endpoint for the storage service.
  • Increase security for the virtual network (VNet), by enabling you to block exfiltration of data from the VNet.
  • Securely connect to storage accounts from on-premises networks that connect to the VNet using VPN or ExpressRoutes with private-peering.


Creating the Private endpoint is a bit tricky in PowerShell and quicker in the GUI if you do this in several steps as in the blog post.

image

So we give the Connection a name and place it in a region

image

Selecting the Resource that we want to point, in this case it is the Files server and I bind this to the Network

imageimage

All the steps are completed.

image image

Now that the PrivateLink is created We add the DNS zone if not already done. this is needed when local Clients “on-premises” want to connect to the share   

This DNS zone is needed as we want to access from the on-premises Machine to the Azure share. connected over the VPN tunnel. You can also choose to connect over the internet, Or have the option to add the Azure file share to the DFS

First we are making a DNS forwarder rule that is needed for the creating DNS forwarding rule set, which defines which Azure services you want to forward requests.

$ruleset=New-AzDnsForwardingRuleSet -AzureEndpoints StorageAccountEndpoint
$ruleset.DnsForwardingRules

image

image

The Core.windows.net forwarder is needed. the IP 168.63.129.16 is the Microsoft DNS

# Deploy and configure DNS forwarders
New-AzDnsForwarder -DnsForwardingRuleSet $ruleSet -VirtualNetworkResourceGroupName "rsg-vnet-sponsor01" -VirtualNetworkName "Azure-vnet-sponsor01" -VirtualNetworkSubnetName "Management"

image

Confirm DNS forwarders:

Resolve-DnsName -Name storfileserver20.file.core.windows.net

image

Make sure you configure on the on-premises DNS the Forwarder to the Azure DNS, in this case to my Azure AD VM that runs also DNS

image

image

Now that the DNS is in place we can connect to the Azure files share in the cloud but also on premises with the connection routed to the VPN tunnel instead of direct to the internet.


Setting Permissions on the Azure Files Shares is not complicated.

With the general availability of AADDS authentication for Azure Files, Microsoft introduced three Azure built-in roles for granting share-level permissions to users:

•Storage File Data SMB Share Reader allows read access in Azure Storage file shares over SMB.

•Storage File Data SMB Share Contributor allows read, write, and delete access in Azure Storage file shares over SMB.

•Storage File Data SMB Share Elevated Contributor allows read, write, delete and modify NTFS permissions in Azure Storage file shares over SMB.


Azure Files supports the full set of NTFS basic and advanced permissions. You can view and configure NTFS permissions on directories and files in an Azure file share by mounting the share and then using Windows File Explorer or running the Windows icacls or Set-ACL command.

To configure NTFS with Admin permissions, you must mount the share by using your storage account key from your domain-joined VM.

The following sets of permissions are supported on the root directory of a file share:

  • BUILTIN\Administrators:(OI)(CI)(F)
  • NT AUTHORITY\SYSTEM:(OI)(CI)(F)
  • BUILTIN\Users:(RX)
  • BUILTIN\Users:(OI)(CI)(IO)(GR,GE)
  • NT AUTHORITY\Authenticated Users:(OI)(CI)(M)
  • NT AUTHORITY\SYSTEM:(F)
  • CREATOR OWNER:(OI)(CI)(IO)(F)
Mount a file share from the command prompt

Use the Windows net use command to mount the Azure file share. Remember to replace the placeholder values in the following example with your own values. For more information about mounting file shares, see Use an Azure file share with Windows.

net use <desired-drive-letter>: \\<storage-account-name>.file.core.windows.net\<share-name> /user:Azure\<storage-account-name> <storage-account-key>

Configure NTFS permissions with icacls

Use the following Windows command to grant full permissions to all directories and files under the file share, including the root directory. Remember to replace the placeholder values in the example with your own values.

icacls <mounted-drive-letter>: /grant <user-email>:(f)


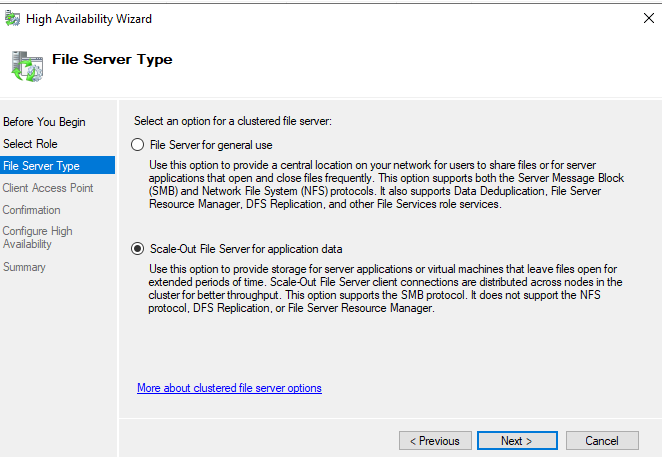
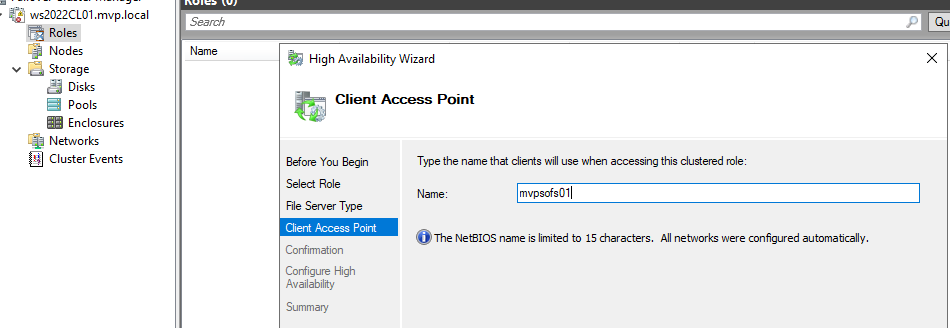
An other option with Azure files is Connect your Azure files to the DFS server

First I had to play a bit with the naming convention as the root of the file is not the share.

Below is the azure folder. so the share name would be \\storfileserver20.file.core.windows.net\blogshare03

image

As I use now the internal DNS and with the DFSN link 

image

I can do domain name \ share and the files are being placed on the Azure file share. here you can also see that the naming is one step deeper. in the domain share name then there is the linked folder to the Azure Files.

On the time that I wrote this blog the Azure files snapshots came also GA.

image

there is no scheduled counter behind this. just press and shoot but with an script or automation account you can create  nice solutions to keep your files save.

Hope this blog is helpful, It helped me to play with this and got some other ideas than just pasting the net use command  to a device and then place the files. still there is nothing wrong with that.


Follow Me on Twitter @ClusterMVP

Follow My blog https://robertsmit.wordpress.com

Linkedin Profile Robert Smit MVP Linkedin profile

Google  : Robert Smit MVP profile

How to join Windows Server 2019 to the Azure AD #AAD #Winserv #WIMVP #AD #Hybrid #Azure

For Some time it is possible to join devices to the Azure AD. Personally I know this was working for Windows 10 but Windows Server 2019, in this blog post I’ll show some ideas and thoughts. It would be nice  if native Azure MFA would work to log on. Also for some options your Azure AD needs to be at least P1.

Organizations can now utilize Azure Active Directory (AD) authentication for their Azure virtual machines (VMs) running Windows Server 2019 Datacenter edition or Windows 10 1809 and later. Using Azure AD to authenticate to VMs provides you with a way to centrally control and enforce policies. Tools like Azure Role-Based Access Control (RBAC) and Azure AD Conditional Access allow you to control who can access a VM. This Blog shows you how to create and configure a Windows Server 2019 VM to use Azure AD authentication and how to remove the Azure AD join and switch back to Active directory Domain join.

The following Windows distributions are currently supported during the preview of this feature:

  • Windows Server 2019 Datacenter
  • Windows 10 1809 and later

So the machine below is in a workgroup but Azure AD joined. on a server is it not visible that the machine is Azure AD joined in the UI.

image

In the Configuration properties in an Azure VM we can set the following properties. Login with AAD credentials. This is during creation of the new VM that way the VM is directly Azure AD joined.

image

Just deployed a new VM. and this VM is Azure AD joined, but what if you want to domain join this machine can we do a hybrid domain join for short NO.

image

Remember Some options only work if you have a P1 or a P2 Azure AD license here you can find the differences https://azure.microsoft.com/en-us/pricing/details/active-directory/

image

Looking at the devices in the Azure AD devices we can see the Server is Azure AD Joined.

image

Giving Access to the VM can be based on RBAC

Two RBAC roles are used to authorize VM login:

  • Virtual Machine Administrator Login: Users with this role assigned can log in to an Azure virtual machine with administrator privileges.
  • Virtual Machine User Login: Users with this role assigned can log in to an Azure virtual machine with regular user privileges.

To allow a user to log in to the VM over RDP, you must assign either the Virtual Machine Administrator Login or Virtual Machine User Login role. An Azure user with the Owner or Contributor roles assigned for a VM do not automatically have privileges to log in to the VM over RDP. This is to provide audited separation between the set of people who control virtual machines versus the set of people who can access virtual machines.

Select the VM and choose IAM press Add and add role assignment. just as you do with other workloads.

image

image

Or use the Azure CLI

$username=(az account show –query user.name –output tsv)

$vm=(az vm show –resource-group rsg-adjoin001 –name 2019vmadjoin –query id -o tsv)

az role assignment create  –role "Virtual Machine Administrator Login" –assignee $username –scope $vm

image

But what If we want to do a Domain join ?

There is no hybrid domain join and no console unjoin. Redeploy would not be the best option right.

image

With the DSRegCmd /Leave we can unregister the VM from the Azure AD.

image

now back to the Domain join without a reboot we can join the VM direct to the Classic Active directory.

image

Remember a reboot is needed for this.

image

Now the VM is normal AD joined.

This option is still in preview and after removing the Azure AD still shows that the VM is Azure Ad joined, it seems there is no trigger to remove the AADLoginForWindows extention in the VM.

The hybrid join could me a great addition to make VM’s connectable with Azure MFA. But for now we can assign policy’s and rules.


Follow Me on Twitter @ClusterMVP

Follow My blog https://robertsmit.wordpress.com

Linkedin Profile Robert Smit MVP Linkedin profile

Google  : Robert Smit MVP profile

Step by Step Azure Active Directory (Azure AD) Connect Cloud Provisioning

Recently a new option for AD sync is in preview Azure AD Connect cloud provisioning, Azure AD Connect Cloud Provisioning can run in a tenant already using Azure AD Connect Sync, Support for synchronizing to an Azure AD tenant from a multi-forest disconnected Active Directory forest environment. This is currently not possible with AD connect. and many organizations are struggling with this.

Simplified installation with light-weight provisioning agents: The agents act as a bridge from AD to Azure AD, with all the sync configuration managed in the cloud.

  • Multiple provisioning agents can be used to simplify high availability deployments, particularly critical for organizations relying upon password hash synchronization from AD to Azure AD.

Azure Active Directory (Azure AD) Connect Cloud Provisioning

The common scenarios include merger & acquisition, where the acquired company’s AD forests are isolated from the parent company’s AD forests and companies that have historically had multiple AD forests.

Azure Active Directory (Azure AD) Connect Cloud Provisioning

Multiple provisioning agents can be used to simplify high availability deployments, particularly critical for organizations relying upon password hash synchronization from AD to Azure AD.

Azure Active Directory (Azure AD) Connect Cloud Provisioning

Here I have a sample of 3 the same used accounts but different domain, now with the Azure Active Directory (Azure AD) Connect Cloud Provisioning they are synced into a single AAD.

image

If there is a firewall between your servers and Azure AD, configure the following items:

Ensure that agents can make outbound requests to Azure AD over the following ports:

Port number and How it’s used

  • 80  Downloads the certificate revocation lists (CRLs) while validating the SSL certificate
  • 443 Handles all outbound communication with the service
  • 8080(optional) Agents report their status every 10 minutes over port 8080, if port 443 is unavailable. This status is displayed on the Azure AD portal.

Also the Following URL’s need to be unblocked.

You can test access using the test portal  https://aadap-portcheck.connectorporttest.msappproxy.net/

msappproxy.net domain Ports Test Tool

Now that I know that all the ports are open we can start with the deployment.

Go to the Azure portal and open the Active directory Blade.

https://portal.azure.com/#blade/Microsoft_AAD_IAM/ActiveDirectoryMenuBlade/AzureADConnect

image

When clicking the Provisioning link the new window opens with the download Agent in the ribbon.

image

Now that we have downloaded the Agent we can start the installation, Keep in mind if you don’t have installed the latest .NET version you need to install this and it will take a kernel reboot.

Azure Active Directory (Azure AD) Connect Cloud Provisioning

Azure Active Directory (Azure AD) Connect Cloud Provisioning

A quick setup and our next step is the Configuration.

Azure Active Directory (Azure AD) Connect Cloud ProvisioningAzure Active Directory (Azure AD) Connect Cloud Provisioning

Us a service account for the Sync, and keep in mind that your domain settings are correct else all the accounts got synced with the *.onmicrosoft.com

Azure Active Directory (Azure AD) Connect Cloud Provisioning

My local Active directory domain.

image

In this demo I use the Administrator but don’t use this account in you production site. Create a proper account for this.

Azure Active Directory (Azure AD) Connect Cloud Provisioningimage

Now that the AD is connected we can kick off the sync and move on to the next steps/

Azure Active Directory (Azure AD) Connect Cloud Provisioning

image

The Agent is creating two services on the sync server.

Azure Active Directory (Azure AD) Connect Cloud Provisioning

In the Azure portal you can see the sync status. I did already do a couple of installs so no panic if your layout is different.

Azure Active Directory (Azure AD) Connect Cloud ProvisioningAzure Active Directory (Azure AD) Connect Cloud Provisioning

Now we are checking if the Agent is running and use review all agents as default there is an extra step to take

image 

In previews you can always give feedback so when the product is GA there is a good chance that the menu’s will change.

Azure Active Directory (Azure AD) Connect Cloud Provisioning

As you can see it is active, If it is not active check the Services on the on-premises server where you installed the Agent

You can also your external public IP

Azure Active Directory (Azure AD) Connect Cloud Provisioning

You can also check the services state:

  • Microsoft Azure AD Connect Agent Updater (in charge of updating to the latest agent version)
  • Microsoft Azure AD Connect Provisioning Agent (in charge of the synchronization)

Our next step is configuring the Azure AD Connect cloud provisioning, using password hash and setup a notification email.

Azure Active Directory (Azure AD) Connect Cloud Provisioning

Now that the configuration is complete we are ready for production

Azure Active Directory (Azure AD) Connect Cloud Provisioning

we save this config and check the agent health status.

Azure Active Directory (Azure AD) Connect Cloud Provisioning

For testing you can use the Cloud applications portal. https://myapps.microsoft.com

Azure Active Directory (Azure AD) Connect Cloud Provisioning

When logging in you will see the apps that are assigned to that user.

Configuration changes are synced every 2 minutes while the provisioning interval is every 40 minutes.

All agent activities are logged into the Applications and Services Logs\Microsoft\AzureADConnect\ProvisioningAgent\Admin

image

AgentUpdater for any agent updated activities (you will see there if there has been an update) or ProvisioningAgent for any provisioning activities.


Follow Me on Twitter @ClusterMVP

Follow My blog https://robertsmit.wordpress.com

Linkedin Profile Robert Smit MVP Linkedin profile

Google  : Robert Smit MVP profile