Deploy Windows Admin Center High Availability running on a Windows Server 2019 Cluster #winserv #WAC #WindowsAdminCenter #AzureArc #Azure #Hybrid

The new new tool Windows Admin Center is THE tool to use when managing your Environment you can install this on almost any server (no Domain Controller) but even this device needs a reboot from time to time. Therefor we make the Windows Admin Center High available. When installing this on a cluster the Tools gets better uptime. And is there when you need it. The resources that are used is minimal.

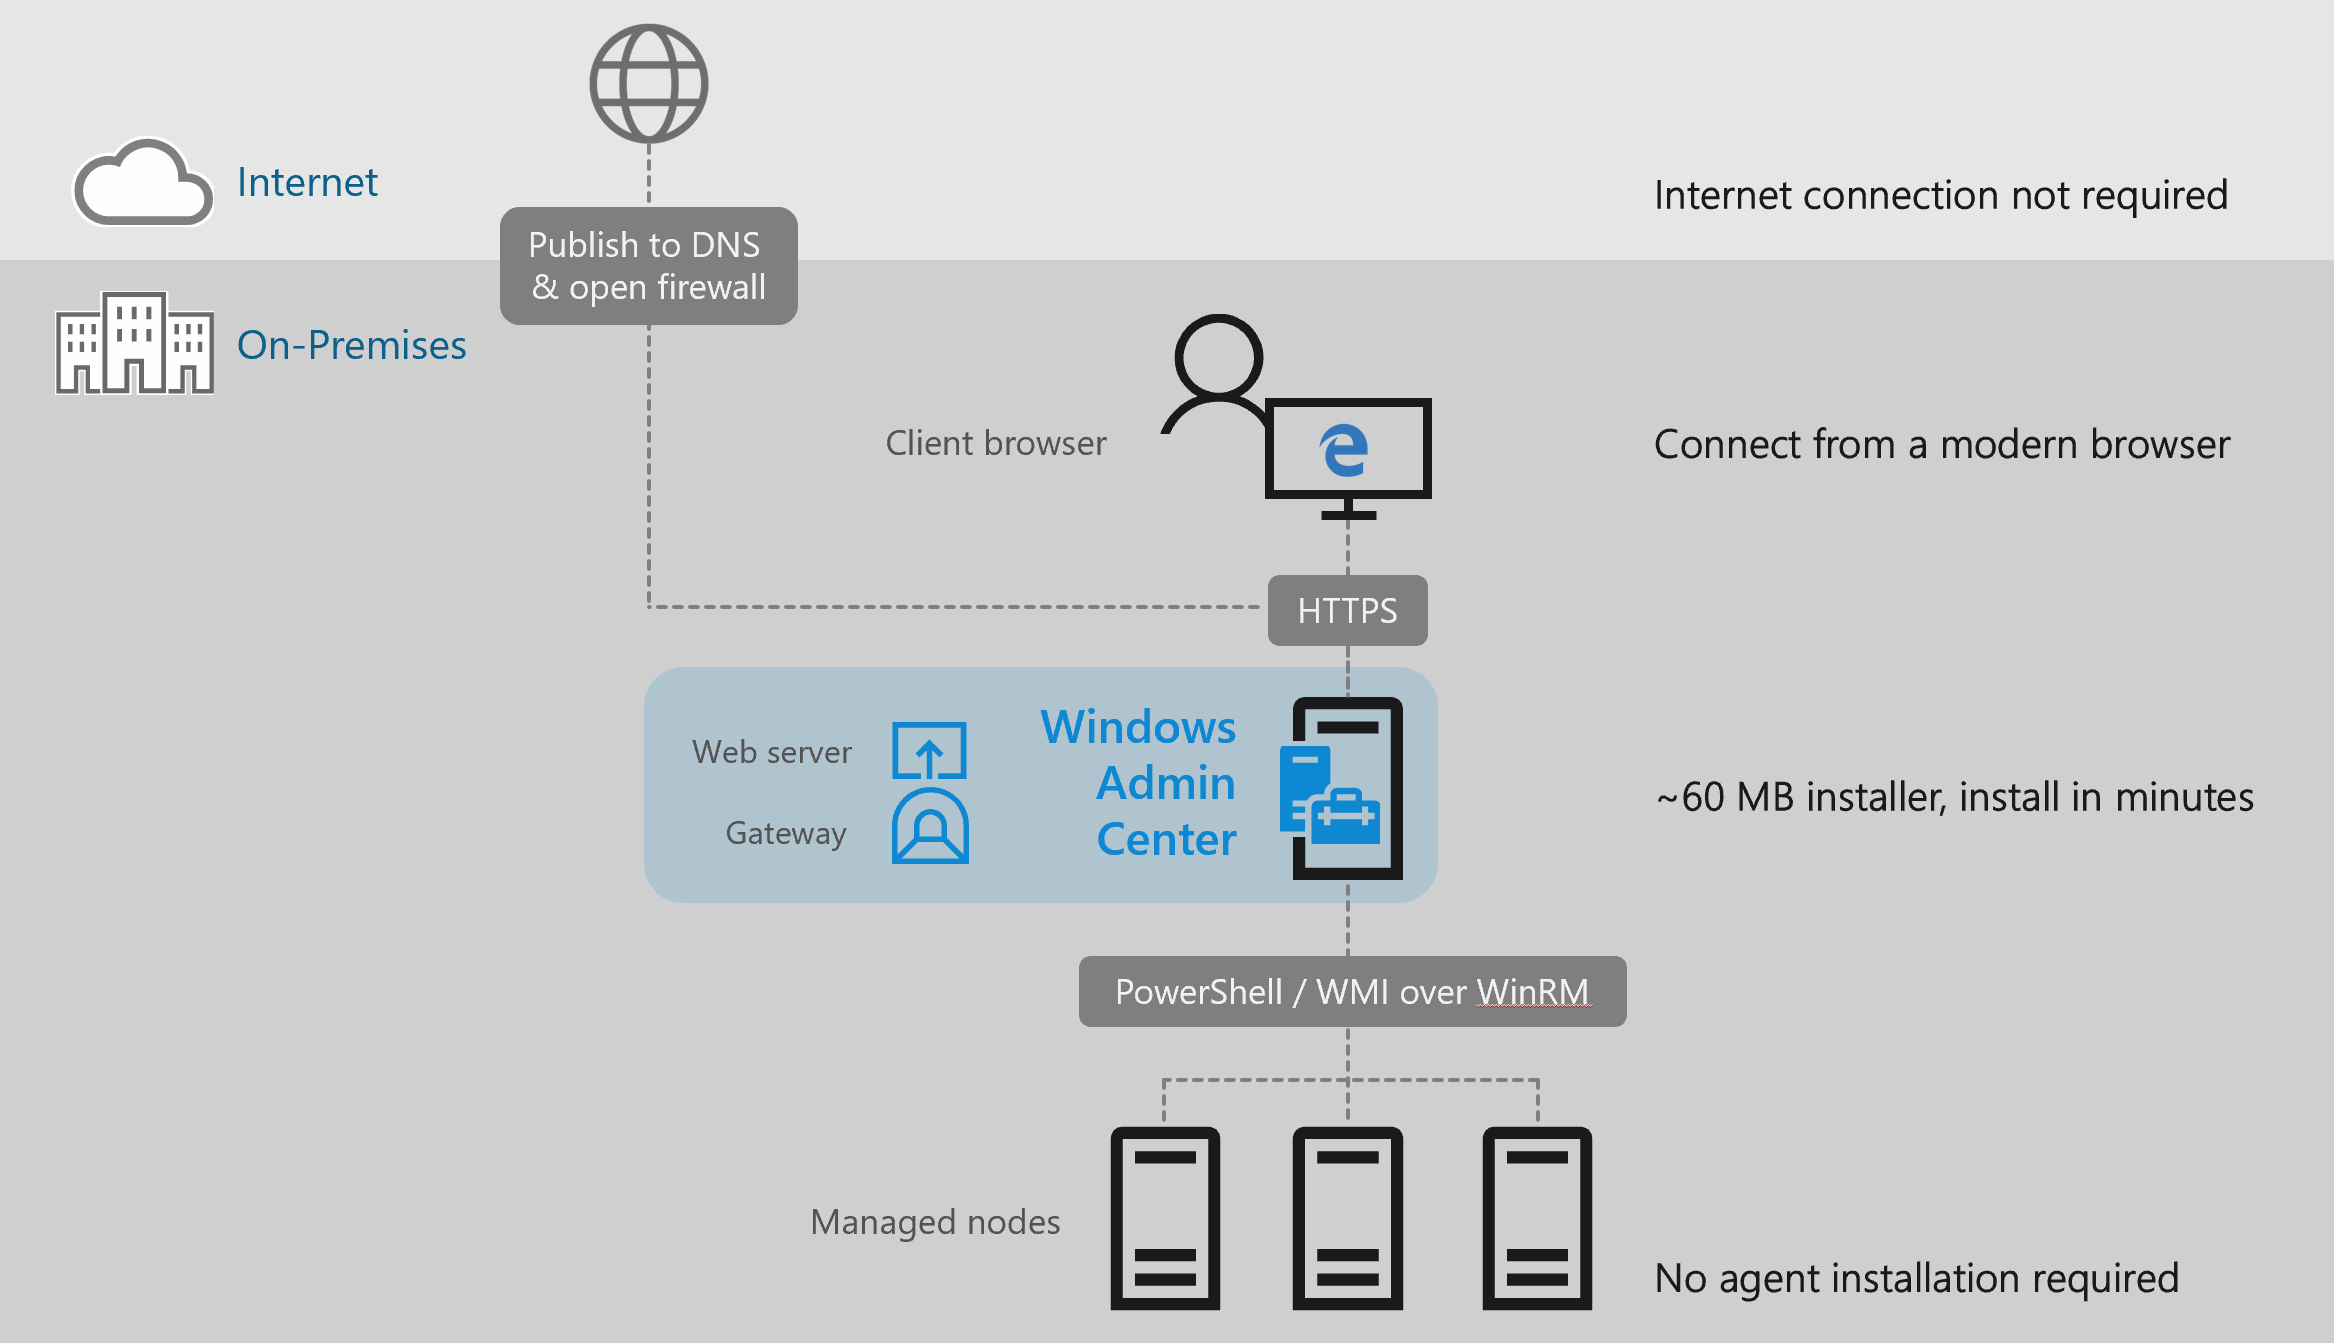
Windows Admin Center is a new, locally-deployed, browser-based management tool set that lets you manage your Windows Servers with no Azure or cloud dependency. Windows Admin Center gives you full control over all aspects of your server infrastructure and is particularly useful for managing servers on private networks that are not connected to the Internet.

Windows Admin Center is the modern evolution of “in-box” management tools, like Server Manager and MMC. It complements System Center – it’s not a replacement.

First we take our cluster, in this case my test cluster witch runs all kinds of load.

image

Get the latest Windows Admin center build. http://aka.ms/WACDownload

save this on the Cluster node, and remember you can’t run Windows Admin Center with IE – Internet Explorer!

When checking this I saw the Cluster team create already a Powershell Script to make the WAC HA. so there goes my blog.

image

Well You can run the PowerShell Scripts. But that’s no Fun.  but I understand if you are busy and or you don’t want to know what is behind the script.

https://docs.microsoft.com/en-us/windows-server/manage/windows-admin-center/deploy/high-availability

image

In this case I do it all manual, well not all there are some good parts in the Script

First we need a Certificate, I use a self signed and yes this needs to be changed every 90 days

Fill in the Variables 

$clientAccessPoint=”mvpwac03″
$tmpPassword = “Temppassword”
$certPath = “c:\temp\sme3.pfx”
#####
Write-Output “Creating self signed certificate”
    $domain= (Get-WmiObject win32_computersystem).Domain
    $dnsName = $clientAccessPoint+”.”+$domain
    $cert = New-SelfSignedCertificate -DnsName $dnsName -CertStoreLocation “cert:\LocalMachine\My” -NotAfter (Get-Date).AddMonths(3)
    $certPassword = ConvertTo-SecureString -String $tmpPassword -Force -AsPlainText
    $cert | Export-PfxCertificate -FilePath $certPath -Password $certPassword | Out-Null 


image

Import the Certificate

$cert.Import($certPath, $certPassword,’DefaultKeySet’)

image

Save the Thumbprint for later

$cert.Thumbprint

image

Now We are installing the Windows Admin Center , I use a preview but get the latest version here http://aka.ms/WACDownload

imageimage

Don’t forget the trusted site checkbox.

imageimage

Here is the Thumbprint that is used in the Certificate , Next is installing the Windows Admin Center.

image

Now that Windows Admin Center is installed We are almost ready.

The next steps are stopping the services and set this to manual as the Failover Cluster Manager controls the run status

Set-Service ServerManagementGateway -startuptype “manual”
Stop-Service ServerManagementGateway

image

Now that this is ready we need to think about the file location as this is currently on the C drive.

image

And we don’t want to have two or more configurations. there for we place this on the CSV volume.

Copy all the file into the CSV volume folder

imageimage

When this is done we are adjusting the Services.

imageimage


$staticAddress=”10.255.255.222″
$portNumber=”443″
$smePath=”C:\ClusterStorage\vdisk20\ux”
$certThumbprint=”1D243A17BBD62271DA0DF8EE4FF0FD65C5AE5A37″
$clientAccessPoint=”mvpwac03″
$registryPath = “HKLM:\Software\Microsoft\ServerManagementGateway\Ha”

    New-ItemProperty -Path $registryPath -Name IsHaEnabled -Value “true” -PropertyType String -Force | Out-Null
    New-ItemProperty -Path $registryPath -Name StoragePath -Value $smePath -PropertyType String -Force | Out-Null
    New-ItemProperty -Path $registryPath -Name Thumbprint -Value $certThumbprint -PropertyType String -Force | Out-Null
    New-ItemProperty -Path $registryPath -Name Port -Value $portNumber -PropertyType DWord -Force | Out-Null
    New-ItemProperty -Path $registryPath -Name ClientAccessPoint -Value $clientAccessPoint -PropertyType String -Force | Out-Null
    $staticAddressValue = $staticAddress -join ‘,’
    New-ItemProperty -Path $registryPath -Name StaticAddress -Value $staticAddress -PropertyType String -Force | Out-Null
   
    New-ItemProperty -Path HKLM:\Software\Microsoft\ServerManagementGateway -Name InstallDir -Value $smePath -PropertyType String -Force | Out-Null
    New-ItemProperty -Path HKLM:\SYSTEM\CurrentControlSet\Services\ServerManagementGateway -Name ImagePath -Value $smePath\sme.exe -PropertyType String -Force | Out-Null

   
    #grant permissions to Network Service for the UX folder
    $Acl = Get-Acl $UxFolder
    $sID = New-Object System.Security.Principal.SecurityIdentifier(“S-1-5-20″)
    $Ar = New-Object  system.security.accesscontrol.filesystemaccessrule($sID,”FullControl”,”ContainerInherit,ObjectInherit”,”None”, “Allow”)
    $Acl.SetAccessRule($Ar)
    Set-Acl $UxFolder $Acl


After running this the path changed to the CSV location and the HA values are there

image


image

The Windows Admin Center HA values are there.

The last step on this cluster node is creating the cluster resource.

$staticAddress=”10.255.255.222″
$clientAccessPoint=”mvpwac03″
$registryPath2 = “SOFTWARE\Microsoft\ServerManagementGateway\Ha”
   
Add-ClusterGenericServiceRole -ServiceName ServerManagementGateway -Name $clientAccessPoint -CheckpointKey $registryPath2 -StaticAddress $staticAddress

image

Remember the HA cluster resource does not need the  HKLM:\ as in the other variables.

image

Now we have installed the Windows Admin Center in the Cluster.  For all the other nodes in the cluster we need to do almost the same.

Or we could export the Register keys and add them in the nodes as we already placed the files on the CSV and created a cluster resource.

All the other nodes don’t have a Windows Admin Center services. Using the register keys is working but you will need a reboot.  As we create first a fake services and then place the regkeys no reboot is needed. Or just import the register keys and do a reboot of the node.

New-Service -Name ServerManagementGateway -DisplayName “Windows Admin Center” -BinaryPathName “C:\ClusterStorage\vdisk20\ux”

First regkey <>

Windows Registry Editor Version 5.00

[HKEY_LOCAL_MACHINE\SOFTWARE\Microsoft\ServerManagementGateway]
“Version”=”1.1.24609.0”
“InstallDir”=”C:\\ClusterStorage\\vdisk20\\ux”
“SmePort”=”443”
“UseHttps”=”1”
“DevMode”=””
“DataEncryptionCertificateThumbprint”=”83D5FBC5AD758C2B23BADBD83117AC5EAA0E8F2B”
“RedirectPort80″=”1”

[HKEY_LOCAL_MACHINE\SOFTWARE\Microsoft\ServerManagementGateway\Ha]
“IsHaEnabled”=”true”
“StoragePath”=”C:\\ClusterStorage\\vdisk20\\ux”
“Thumbprint”=”1D243A17BBD62271DA0DF8EE4FF0FD65C5AE5A37”
“Port”=dword:000001bb
“ClientAccessPoint”=”mvpwac03”
“StaticAddress”=”10.255.255.222”


Second Regkey <>

Windows Registry Editor Version 5.00

[HKEY_LOCAL_MACHINE\SYSTEM\CurrentControlSet\Services\ServerManagementGateway]
“Type”=dword:00000010
“Start”=dword:00000003
“ErrorControl”=dword:00000001
“ImagePath”=”C:\\ClusterStorage\\vdisk20\\ux\\sme.exe”
“DisplayName”=”Windows Admin Center”
“ObjectName”=”NT Authority\\NetworkService”
“Description”=”Windows Admin Center”
“FailureActions”=hex:80,51,01,00,00,00,00,00,00,00,00,00,03,00,00,00,14,00,00,\
  00,00,00,00,00,d0,07,00,00,00,00,00,00,d0,07,00,00,00,00,00,00,00,00,00,00
“Environment”=hex(7):43,00,4f,00,4d,00,50,00,55,00,54,00,45,00,52,00,4e,00,41,\
  00,4d,00,45,00,3d,00,4d,00,56,00,50,00,57,00,41,00,43,00,30,00,33,00,00,00,\
  5f,00,43,00,4c,00,55,00,53,00,54,00,45,00,52,00,5f,00,4e,00,45,00,54,00,57,\
  00,4f,00,52,00,4b,00,5f,00,46,00,51,00,44,00,4e,00,5f,00,3d,00,4d,00,56,00,\
  50,00,57,00,41,00,43,00,30,00,33,00,2e,00,6d,00,76,00,70,00,2e,00,6c,00,6f,\
  00,63,00,61,00,6c,00,00,00,5f,00,43,00,4c,00,55,00,53,00,54,00,45,00,52,00,\
  5f,00,4e,00,45,00,54,00,57,00,4f,00,52,00,4b,00,5f,00,48,00,4f,00,53,00,54,\
  00,4e,00,41,00,4d,00,45,00,5f,00,3d,00,4d,00,56,00,50,00,57,00,41,00,43,00,\
  30,00,33,00,00,00,5f,00,43,00,4c,00,55,00,53,00,54,00,45,00,52,00,5f,00,4e,\
  00,45,00,54,00,57,00,4f,00,52,00,4b,00,5f,00,4e,00,41,00,4d,00,45,00,5f,00,\
  3d,00,4d,00,56,00,50,00,57,00,41,00,43,00,30,00,33,00,00,00,00,00

With this in place all nodes can run Windows admin center in HA mode, but it will not run on IE. and this is the only default browser on the server. To test if it is working you will need Edge or Chrome.

image

As you can see it is not that simple to make things high available. Using the Powershell scripts provided by microsoft But if using these script you need to rename the MSI file if you are using the insiderspreview or any other build that is not named as ServerManagementGateway.msi

WindowsAdminCenterPreview1808.msi rename to ServerManagementGateway.msi 

You can deploy Windows Admin Center in a failover cluster to provide high availability for your Windows Admin Center gateway service. The solution provided is an active-passive solution, where only one instance of Windows Admin Center is active. If one of the nodes in the cluster fails, Windows Admin Center gracefully fails over to another node, letting you continue managing the servers in your environment seamlessly.

High-availability deployment scripts from Windows Admin Center HA Setup Scripts zip file. Download the .zip file containing these scripts to your local machine and then copy the scripts as needed.


Follow Me on Twitter @ClusterMVP

Follow My blog https://robertsmit.wordpress.com

Linkedin Profile Robert Smit MVP Linkedin profile

Google  : Robert Smit MVP profile

Upgrading and what is new in Windows Server 2019 Clustering #winserv #RunWS2019 #WindowsServer2019

This blog post is the first of a series on Windows Server 2019. #MSIgnite is coming and there will be a lot of new features coming. So in preparation I’ll show you what is changed and how to build things in Windows Server 2019. In this there is a upgrade and some new functions to the Cluster.

  1. Hybrid: Windows Server 2019 and Windows Admin Center will make it easier for our customers to connect existing on-premises environments to Azure. With Windows Admin Center it also easier for customers on Windows Server 2019 to use Azure services such as Azure Backup, Azure Site Recovery, and more services will be added over time.
  2. Security: Security continues to be a top priority for our customers and we are committed to helping our customers elevate their security posture. Windows Server 2016 started on this journey and Windows Server 2019 builds on that strong foundation, along with some shared security features with Windows 10, such as Defender ATP for server and Defender Exploit Guard.
  3. Application Platform: Containers are becoming popular as developers and operations teams realize the benefits of running in this new model. In addition to the work we did in Windows Server 2016, we have been busy with the Semi-Annual Channel releases and all that work culminates in Windows Server 2019. Examples of these include Linux containers on Windows, the work on the Windows Subsystem for Linux (WSL), and the smaller container images.
  4. Hyper-converged Infrastructure (HCI): If you are thinking about evolving your physical or host server infrastructure, you should consider HCI. This new deployment model allows you to consolidate compute, storage, and networking into the same nodes allowing you to reduce the infrastructure cost while still getting better performance, scalability, and reliability.


Installing the Windows Server 2019 is not different than 2016. There is an extra disk space warning menu.

imageimage

As an upgrade I want to keep my files.

imageimage

If you need to free up more disk space then there is a little warning. It may happen that the screen needs to refresh before you see the confirm option.

image

The upgrade is starting depending on the server speed it will take some time.image image

After the upgrade is done and the first logon the Server manager is starting and there is a popup of would you like to install Windows Admin Center.

image


Now that the upgrade is done we can take a look at the Cluster Changes. First if we check the Cluster Functional Level with PowerShell.

Get-Cluster | Select ClusterFunctionalLevel

image

This is now Version 10

  • Windows Server 2012 R2 functional level value of 8
  • Windows Server 2016 functional level value of 9
  • Windows Server 2019 functional level value of 10


Windows Server 2019 USB file Witness

The other big change is the placement of your witness files. this can now be on a USB device.

image

One of the quorum models for Failover Clustering is the ability to use a file share as a witness resource.  As a recap, the File Share Witness is designated a vote in the Cluster when needed and can act as a tie breaker in case there is ever a split between nodes (mainly seen in multi-site scenarios). See also my other blog posts https://robertsmit.wordpress.com/category/clustering/ 

This means NO kerberos, NO domain controller, NO certificates, and NO Cluster Name Object needed, and NO account needed on the nodes.

Simply plug your USB drive into the port in the router and get into your router’s interface.  In there, you can set up your share name, username, and password for access.  Use the PowerShell command above pointing it to the router and share, and you are good to go.  To answer your next question, this works with SMB 2.0 and above.  SMB 3.0 is not required for the witness type.

image

Setting up the share on my network device

Next is setting the Witness, this can only be done with PowerShell.

Set-ClusterQuorum -FileShareWitness \\SERVER\SHARE -Credential $(Get-Credential)

image

A credential popup, and type your account and password.

image

After this check your cluster and you can see the Witness is set.

image


Other Cluster Changes are there but not direct visible in the Gui PowerShell is needed/

When comparing the Storage space section there are some other options and more. Not all options are new some have a different value.


Windows Server 2019                                                                                                          Windows Server 2016

imageimage

One of these changes is S2DBusTypes in Windows Server 2016 it has a value of 0 but it could be changed if you had different storage. (not supported)

I created a blog post about this to add USB storage to build a SOFS with clustered storage spaces. So enabling the options I start Building My Scaleout File Server with My USB thumbdrive Storage.

https://robertsmit.wordpress.com/2015/05/18/building-usb-sofs-with-storage-spaces-direct-s2d-ws2016/

With a little help of this STORAGE_BUS_TYPE enumeration on MSDN we could do Fun things with some old disks.

https://msdn.microsoft.com/en-us/library/windows/desktop/ff800833(v=vs.85).aspx


In server 2019 it has a value of 396288 which is the the number of the supported disk types for Storage spaces direct.

S2DBusTypes                           : 396288

Changing these values is not best practice and could brake your cluster. Or bring unstable situations. 


Follow Me on Twitter @ClusterMVP

Follow My blog https://robertsmit.wordpress.com

Linkedin Profile Robert Smit MVP Linkedin profile

Google  : Robert Smit MVP profile

Windows 2008R2 Cluster hotfixes


Recently I saw some clusters that are not patched and or where not aware that there were hotfixes.

So here is a list of required and optional Windows 2008R2 SP1 hotfixes.

This list is found on several pages on the web and could be handy.


Windows & Hyper-V : Required Hotfixes

Validate SCSI Device Vital Product Data (VPD) test fails after you install Windows Server 2008 R2 SP1

http://support.microsoft.com/kb/2531907 (required for 3+ node Hyper-V clusters)

The network connection of a running Hyper-V virtual machine may be lost under heavy outgoing network traffic on a computer that is running Windows Server 2008 R2 SP1

http://support.microsoft.com/kb/2263829

The Cluster service stops unexpectedly on a Windows Server 2008 R2 failover cluster node when you perform multiple backup operations in parallel on a cluster shared volume

http://support.microsoft.com/kb/2494162 

MPIO failover fails on a computer that is running Windows Server 2008 R2

http://support.microsoft.com/kb/2460971

The MPIO driver fails over all paths incorrectly when a transient single failure occurs in Windows Server 2008 or in Windows Server 2008 R2

http://support.microsoft.com/kb/2522766

Performance decreases in Windows Server 2008 R2 when the Hyper-V role is installed on a computer that uses Intel Westmere or Sandy Bridge processors

http://support.microsoft.com/kb/2517329 

Stop error 0x0000007a occurs on a virtual machine that is running on a Windows Server 2008 R2-based failover cluster with a cluster shared volume, and the state of the CSV is switched to redirected access.

http://support.microsoft.com/kb/2494016 

Optional Hotfixes

An update is available for Hyper-V Best Practices Analyzer for Windows Server 2008 R2

http://support.microsoft.com/kb/2485986

“0x0000009E” Stop error when you add an extra storage disk to a failover cluster in Windows Server 2008 R2

http://support.microsoft.com/kb/2520235

A virtual machine online backup fails in Windows Server 2008 R2 when the SAN policy is set to Offline All

http://support.microsoft.com/kb/2521348

Cluster node cannot rejoin the cluster after the node is restarted or removed from the cluster in Windows Server 2008 R2

http://support.microsoft.com/kb/2549472

Cluster service stops when an error occurs in the registry replication process of a failover cluster in Windows Server 2008 R2 or in Windows Server 2008

http://support.microsoft.com/kb/2496034

0×20001 Stop error when you start a Linux VM in Windows Server 2008 R2 SP1

http://support.microsoft.com/kb/2550569

A heap memory leak occurs when an application or service queries the MSCluster_Resource WMI class in Windows Server 2008 R2

http://support.microsoft.com/kb/2580360

Cluster service initiates a failover after a delay of about 80 seconds when you shutdown the active node in Windows Server 2008 R2

http://support.microsoft.com/kb/2575625/en-us?sd=rss&spid=14134

New registration entries are added to the Persistent Reservation table when the physical disk resource that is associated with the CSV is taken offline on a Windows Server 2008 R2-based Failover Cluster

http://support.microsoft.com/kb/2579052/en-us?sd=rss&spid=14134

A transient communication failure causes a Windows Server 2008 R2 failover cluster to stop working

http://support.microsoft.com/kb/2550886

Cluster service leaks memory when the service handles state change notifications in Windows Server 2008 R2 or Windows Server 2008

http://support.microsoft.com/kb/2550894

Hyper-V Export function consumes all available memory in Windows Server 2008 or in Windows Server 2008 R2

http://support.microsoft.com/kb/2547551

Microcode update for Intel processors in Windows 7 or in Windows Server 2008 R2

http://support.microsoft.com/kb/2493989

Corrupted VSS snapshot

http://support.microsoft.com/hotfix/KBHotfix.aspx?kbnum=975688&kbln=en-us

FIX: The guest operating system may crash (STOP 0xd) when you perform a live migration of Hyper-V virtual machines in a Windows Server 2008 R2 environment

http://support.microsoft.com/kb/2636573

What is CAU ? Cluster Update Automation with CAU

#CAU is a great new feature but how does it fit in your infrastructure ?

I have already a WSUS server and I use SCCM ,and I use WSUS for my DTAP environment, and now Do I need another WSUS server ? or can I reuse the old WSUS ?

WSUS 3.0SP2 (on W2K8R2): not yet compatible with Windows Server 2012

You can’t use SCCM to pull the Updates.

So basically install a downstream server for the CAU or primary wsus, if you have more WSUS servers you can sync the updates with powershell to hold the same info on all your other servers.


  • Single-click launch of cluster-wide updating operation
  • Or a single PS cmdlet
  • “Updating Run”image
  • Physical or VM clusters
  • CAU scans, downloads and installs applicable updates on each node
  • Restarts node as necessary
  • One node at a time
  • Repeats for all cluster nodes
  • Customize pre-update & post-update behavior with PS scripts


  • Updates (GDRs) from Windows Update or WSUS
  • Hotfixes (QFEs) from a local File Share
  • Simple customization that installs almost any software update off a local File Share


image

  • Adds CAU clustered role
  • Just like any other clustered workload
  • Resilience to planned and unplanned failures
  • Not mutually exclusive with on-demand updating
  • Analogy: Windows Update scan on your PC with AU auto-install
  • But possible conflicts with Updating Runs in progress
  • “Configured, but on hold” functionality
  • Compatible with VCO Prestaging

image

Powershell usage :

Sample: fill in the cluster name and the wsus share.


Invoke-CauScan -ClusterName CONTOSO-FC1 -CauPluginName Microsoft.WindowsUpdatePlugin, Microsoft.HotfixPlugin -CauPluginArguments @{}, @{ ‘HotfixRootFolderPath’ = ‘\\CauHotfixSrv\shareName’; ‘HotfixConfigFilePath’ = ‘\\CauHotfixSrv\shareName\DefaultHotfixConfig.xml’ } -RunPluginsSerially -Verbose
Invoke-CauRun -ClusterName CONTOSO-FC1 -CauPluginName Microsoft.WindowsUpdatePlugin, Microsoft.HotfixPlugin -CauPluginArguments @{ ‘IncludeRecommendedUpdates’ = ‘True’ }, @{ ‘HotfixRootFolderPath’ = ‘\\CauHotfixSrv\shareName’;  ‘HotfixConfigFilePath’ = ‘\\CauHotfixSrv\shareName\DefaultHotfixConfig.xml’ } -MaxRetriesPerNode 2  -StopOnPluginFailure –Force


Options: RunPluginsSerially, StopOnPluginFailure, SeparateReboots

  • CAU supports only Windows Server 2012 clusters
  • Can be installed on Windows 8 Client RSAT package

Make CAU the only tool updating the cluster
Concurrent updates by other tools: e.g., WSUS, WUA, SCCM might cause downtime

For a WSUS-based deployment:

WSUS 4.0: needs a workaround with Beta builds (only) http://social.technet.microsoft.com/wiki/contents/articles/7891.how-wsus-and-cluster-aware-updating-are-affected-by-windows-server-8-beta-updates.aspx 
WSUS 3.0SP2 (on W2K8R2): not yet compatible with Windows Server 2012

Think about firewalls on nodes!
Windows Firewall Beta (or non-Windows firewall): create a firewall rule and enable it for domain-scope, wininit.exe program, dynamic RPC endpoints, TCP protocol
Windows Firewall RC: Enable the "Remote Shutdown" firewall rule group for the Domain profile, or pass the “-EnableFirewallRules” parameter to Invoke-CauRun, Add-CauClusterRole or Set-CauClusterRole cmdlets
Make sure GPOs agree

CAU: Understand and Troubleshoot Guide: http://www.microsoft.com/download/en/details.aspx?id=29015

CAU Scenario Overview: http://technet.microsoft.com/en-us/library/hh831694.aspx

CAU Windows PowerShell cmdlets
‘Update-Help’ downloads the full cmdlet help for CAU cmdlets
Online: http://go.microsoft.com/fwlink/p/?LinkId=237675

Starting with Cluster-Aware Updating: Self-Updating: http://blogs.technet.com/b/filecab/archive/2012/05/17/starting-with-cluster-aware-updating-self-updating.aspx

Virtual Machine Density Flexibility in Windows Server 2008 R2 Failover Clustering

Recently Windows Server 2008 R2 Failover Clustering has changed the support statement for the maximum number of Virtual Machines (VMs) that can be hosted on a failover cluster from 64 VMs per node to 1,000 VMs per cluster.  This article reflects the new policy in Hyper-V: Using Hyper-V and Failover Clustering.

Supporting 1000 VMs will enable increased flexibility to utilize hardware that has the capacity to host more VMs per physical server while maintaining the high availability and management components that Failover Clustering provides. 

Number of Nodes in Cluster

Max Number of VMs per Node

Average Number of VMs per active Node

Max # VMs in Cluster

2 Nodes (1 active + 1 failover)

384

384

384

3 Nodes (2 active + 1 failover)

384

384

768

4 Nodes (3 active + 1 failover)

384

333

1000

5 Nodes (4 active + 1 failover)

384

250

1000

6 Nodes (5 active + 1 failover)

384

200

1000

7 Nodes (6 active + 1 failover)

384

166

1000

8 Nodes (7 active + 1 failover)

384

142

1000

9 Nodes (8 active + 1 failover)

384

125

1000

10 Nodes (9 active + 1 failover)

384

111

1000

11 Nodes (10 active + 1 failover)

384

100

1000

12 Nodes (11 active + 1 failover)

384

90

1000

13 Nodes (12 active + 1 failover)

384

83

1000

14 Nodes (13 active + 1 failover)

384

76

1000

15 Nodes (14 active + 1 failover)

384

71

1000

16 Nodes (15 active + 1 failover)

384

66

1000


Note: There is no requirement to have a node without any VMs allocated as a “passive node”.  All nodes can host VMs and have the equivalent to 1 node of capacity unallocated (total, across all the nodes) to allow for placement of VMs if a node fails or is taken out of active cluster membership for activities like patching or performing maintenance. 

It is important to perform proper capacity planning that takes into consideration the capabilities of the hardware and storage to host VMs, and the total resources that the individual VMs require, while still having enough reserve capacity to host VMs in the event of a node failure to prevent memory over commitment.  The same base guidance of Hyper-V configuration and limits of a maximum number of VMs supported per physical server still apply.  This currently states that no node can host more than 384 running VMs at any given time, and that the hardware scalability should not exceed 4 virtual processors per VM and no more than 8 virtual processors per logical processor.  Review this Technet article on VM limits and requirements: Requirements and Limits for Virtual Machines in Hyper-V in Windows Server 2008 R2

Here are some Frequently Asked Questions:

1. Is there a hotfix or service pack required to have this new limit? 

a. No, this support policy change based on extra testing we have performed to verify that the cluster retains its ability to health detect and failover VMs with these densities.  There are no changes or updates required.

2. 64 VMs per node on a 16 node cluster equals 1024 VMs, so aren’t you actually decreasing the density for a 16 node cluster? 

a. No, the previous policy was to have 64 VMs per node in addition to one nodes equivalent of reserve capacity, which is 15 nodes x 64 VMs which equals 960 with the spare capacity of a passive node.  This policy slightly increases the density for a 16 node cluster an
d the density for an 8 node cluster is more than twice and a 4 node cluster more than 4-times as high as before.

3. Does this include Windows Server 2008 clusters?

a.  This change is only for Windows Server 2008 R2 clusters.

4. Why did you make this change?

a. We are responding to our customers’ requests to have flexibility in the number of nodes and the number of VMs that can be hosted.  For VMs running workloads that have relatively small demand of VM and storage resources, customers would like to place more VMs on each server to maximize their investiments and lower the management costs.  Other customers want the flexibility of having more nodes and fewer VMs. 

5. Does this mean I can go and put 250 VMs on my old hardware?

a. Understanding the resources that your hardware can provide and the requirements of your VMs is still the most important thing in identifying the capacity of your cluster or the specific Hyper-V servers.    Available RAM and CPU resources are relatively easy to calculate, but another important part of the equation is capacity of the SAN/Storage.  Not just how many GB or TB of data it can store, but can it handle the I/O demands with reasonable performance?  1000 VMs can potentially produce a significant amount of I/O demand, and the exact amount will depend on what is running inside the VMs.  Monitoring the storage performance is important to understand the capacity of the solution.

Source :http://blogs.msdn.com/b/clustering/archive/2010/06/28/10031803.aspx